We're well into 2013 now, so I guess it's about time I made the first post of the year!
Firstly, a very happy New Year to everyone. I'm sure, like me, you've all come out of the holidays with bulging waistbands and empty wallets!
Of course, with the new year now upon us, it's time for the usual retrospective look at what was 2012. As usual, I set myself several hobby resolutions.
As usual, I failed almost all of them.
I failed to paint my remaining Skaven (I got some done at the beginning of the year, but not even half of what I have), I failed to construct and paint my Man o' War pirate ship (or the accompanying pirates), I failed to paint the Blood Bowl teams (they didn't even come out of the box all year) and I only managed to paint 121 figures over the course of the year (rather than the 200 I was aiming for).
All in all, a fairly dismal showing. I think it's safe to say that, after two years of failed resolutions, they clearly aren't working for me. I'm too easily distracted by other projects, or dissuaded from making any sort of progress, and so as 2012 was the Year of the Rat (in which I made the vain promise to paint all my Skaven), I hereby declare 2013 to be the Year of the Magpie - I'm simply going to muddle through the next 12 months without any particular focus or aim, and simply paint whatever takes my fancy. It might mean I see lots of projects get started without any of them getting finished, but that's not really any different to how I normally work anyway!
The one aim I do have for 2013 though is to focus on working through the backlog of figures I've got piled up, and to try and avoid buying in to too many new things during the year. I'm going to attempt to keep a tally of exactly how much I spend on hobby stuff, as well as keeping track of how many models I paint compared to how many models I buy. Having not taken this approach before, I'm not sure what I would consider to be a "good" ratio but I think at the very least I should be aiming to paint at least twice as many figures as I buy.
We'll see how it goes...
Tuesday, 8 January 2013
Wednesday, 12 December 2012
More Goodies!
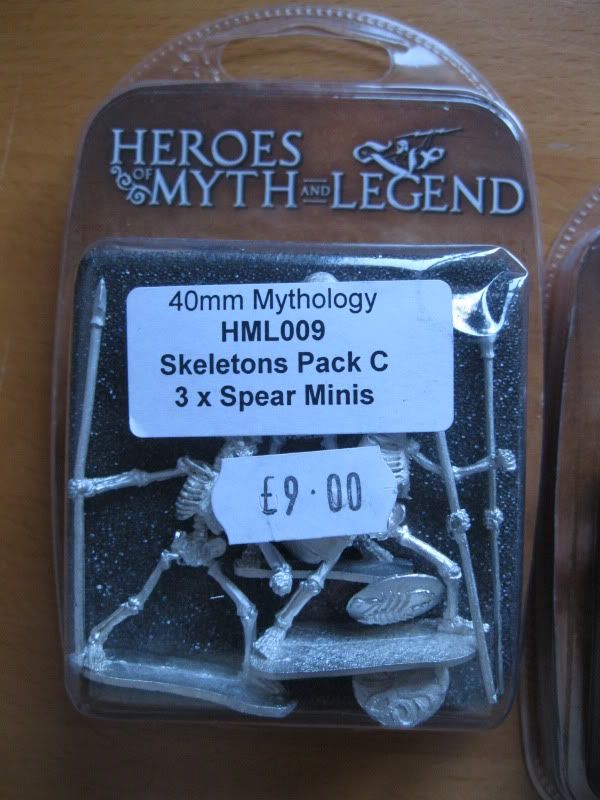
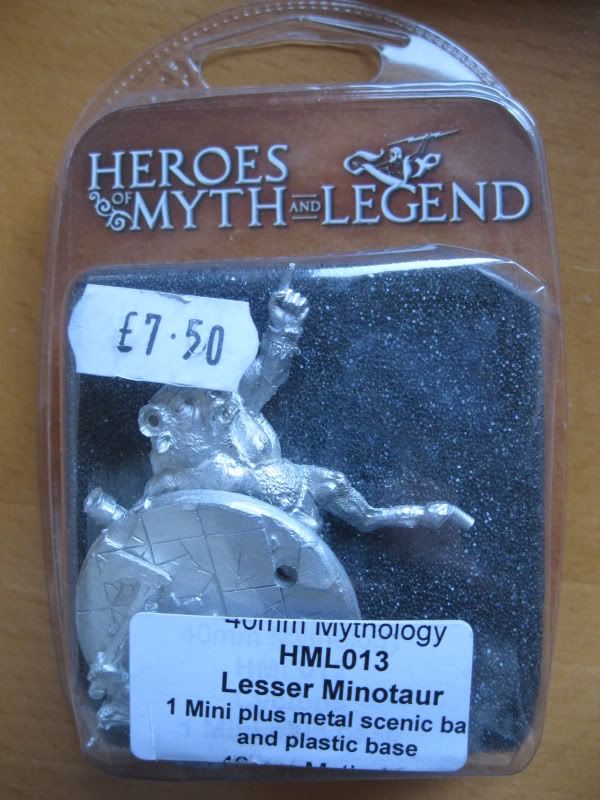
Another bunch of stuff I picked up on sale, this time from Wayland Games' Halloween sale. You might remember the 40mm Greek Heroes I posted up at the very beginning of this blog (if not, you can read about them here), and these are the rest of the set. I had no real plans to buy these beforehand (story of my life!) but the price was too good to resist - the combined retail price, as you can probably work out from the stickers on the blister packs, should have been around £45 (the Skeletons alone are £35, plus the Minotaur for £7.50 - I estimate Jason would be around £4/5). In the sale, I picked the lot up for the grand total of £12.84!
There are four different packs of Skeletons: 3 Spear-armed Skeletons, 3 Sword-armed Skeletons, 3 "Thracian" Skeletons (armed with Spears, but wearing just linen tunics) and 3 "Heroes" (with helmets, armour and swords).


Then of course there's Jason, who is a suitably heroic-looking Brad Pitt-esque hero. He'll team up nicely with the three Greek Heroes I've already got.

And no Greek adventure would be complete without a Minotaur. This is only a "lesser" Minotaur, but it's a good looking figure nonetheless.
All this has given me vague ideas for a 'Jason and the Argonauts' themed skirmish game at some point. Whether that will ever materialise is anyone's guess!
Finally!
At long last, Malifaux has taken hold at Stafford Games and people have started buying Crews and playing games. Finally! Now I have the excuse I wanted to start buying figures of my own!
I've picked up quite a few bits over the last month or so. First up was the Rasputina "Cult of December" box set and a Fate Deck (because Rasputina's cool and I love winter-y bases - an excuse to go to town with some base inserts and snow effects!)

Extra Ice Gamin (you can never have too many Gamin...), a Silent One, Alternative Rasputina (my favourite Malifaux figure) and Rasputina's Avatar of Famine were a few purchases at the Wargamer show.


And I managed to pick up a few extras on sale, just before Maelstrom Games went bust; Marcus, Fire Gamin and two Performers & Mannequins (for when I get a Colette crew going!)


Obviously, the focus here is Arcanists and specifically Rasputina at the moment. It was a Colette crew that I initially had my eye on but after reading around, I figured I needed a "basic" crew to get into the game with before taking on the more challenging Colette. The Arcanists were my faction of choice simply because of the models; they were the one faction where the majority of models appealed to me.
I'm going to hold off on getting these assembled and painted until I've had a think about bases - I've seen some very cool effects on Malifaux models with base inserts and scenic bases, so I'm going to take some time (and wait until after the Christmas post has settled down) to consider some options and plan what I'm going to do with them. I have plenty of models to paint in the meantime!
Tuesday, 11 December 2012
More Dwarves
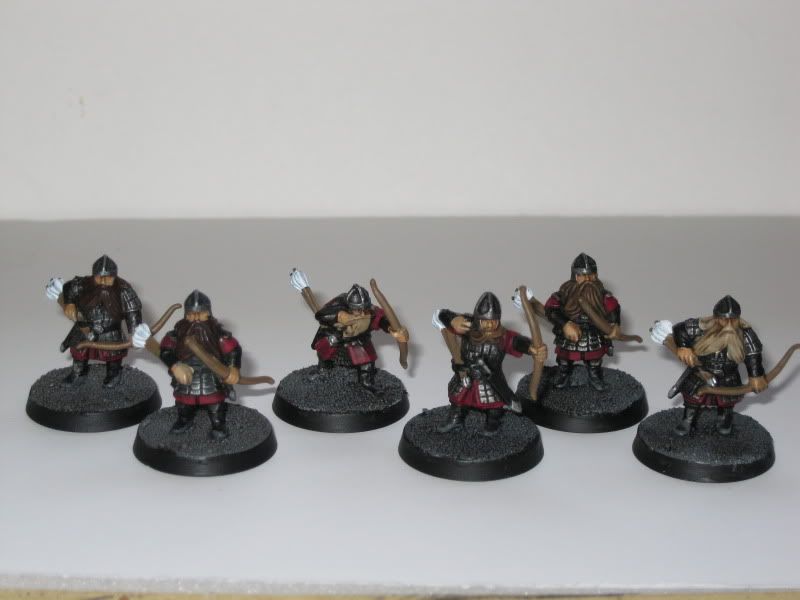
As well as the Moria game boards, I've also been working on my Dwarf forces to battle against the hordes of Moria Goblins. This is just the first batch; I've got another 8 archers, another 8 with shields and 8 with two-handed weapons, plus 6 two-handed weapons that are almost finished (the last group of this first batch). Once they're all painted, I'll have a grand total of 41 Dwarf Warriors (not to mention the Khazad Guard, Iron Guard and Rangers I have still to paint!)

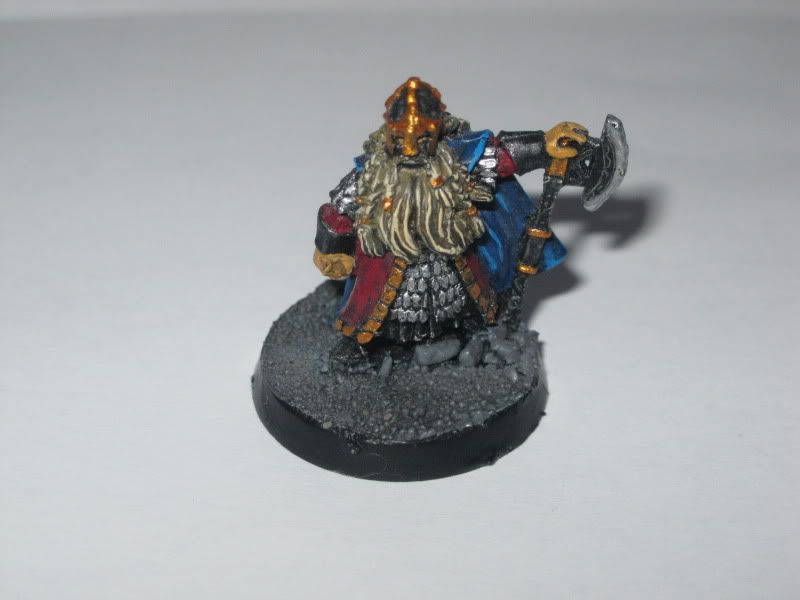
And, as mentioned a few posts ago, I went back to the Dain Ironfoot figure and added a few embellishments. A touch of gold here and there to emphasise his royal status, plus the cloak got a bit of extra treatment as well.

It's the Most Wonderful Time of the Year
Of course, it's that time of year again - yes, it's nearly Christmas but it's also time for Da Warpath's Advent Challenge! For those that don't know, this is a 'challenge' where painters sign up to tackle painting one complete miniature in one day on each day of December. I've taken part before (which you can read about here), and I'm taking part again this year.
I signed up for two days again; the 6th and 13th December. Of course, the 6th has already been and gone, so here's what I painted!
 |
| Before, at precisely 10:01AM! |
 |
| And after, at 7:07PM the same day. |

As you might have guessed, it's a LotR Dwarf Captain. I love the metal LotR Dwarf figures, and they're really easy to paint as well. I actually thought this would take longer than it did, but then it always surprises me when I find I can complete a figure in a day (just think how productive I'd be if I did this every day!)
As I mentioned, I'm also signed up for the 13th, which is this coming Thursday. I'm not sure yet what I'll paint for that - I have a metal Balin figure waiting in the wings, but I'm not sure it would be good form to paint two stunties for a O&G forum! I might have to bring out old Durburz the Goblin King I've been meaning to paint for a while instead.
The Battle of Lech (sort of...)
After much ado then, here are the collected pics of the game we put on at Wargamer this year!
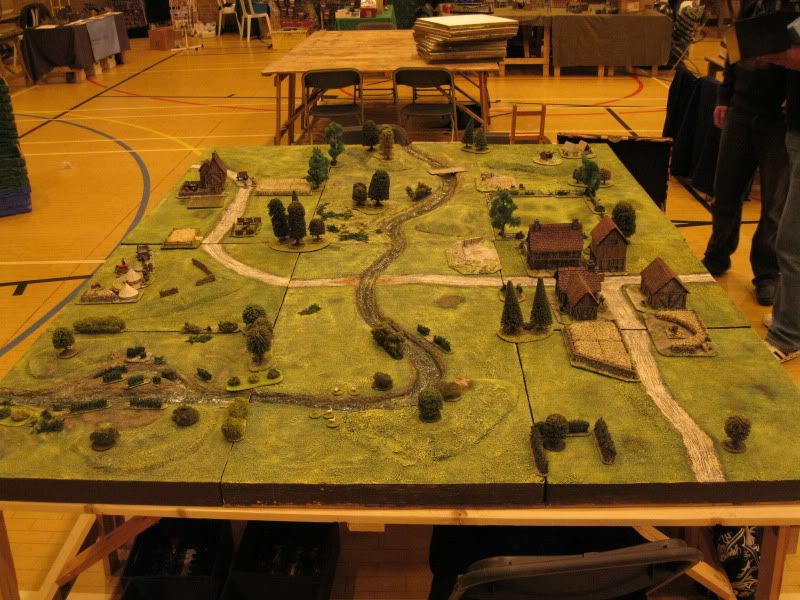
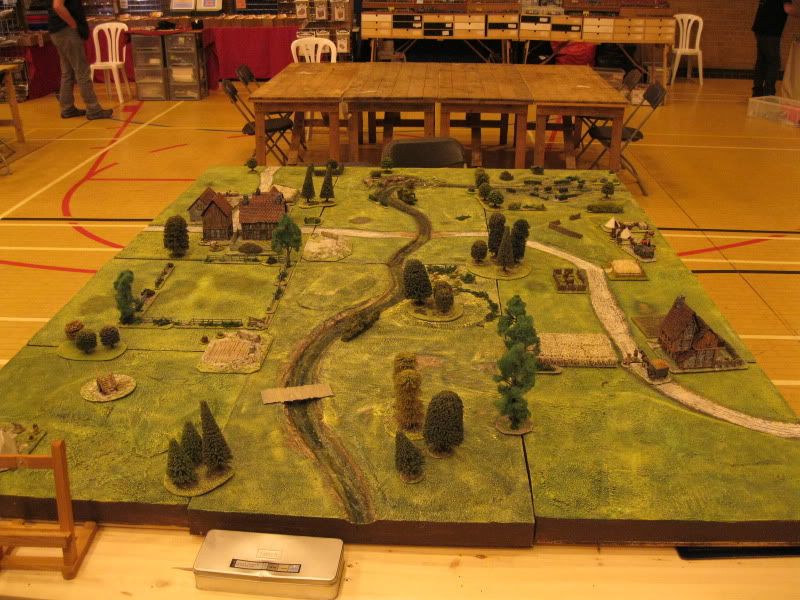
As mentioned previously we came up with a different scenario this time round, and used most of the existing terrain boards with only the addition of a couple of extra river sections. I apologise in advance for the poor lighting of the photos!
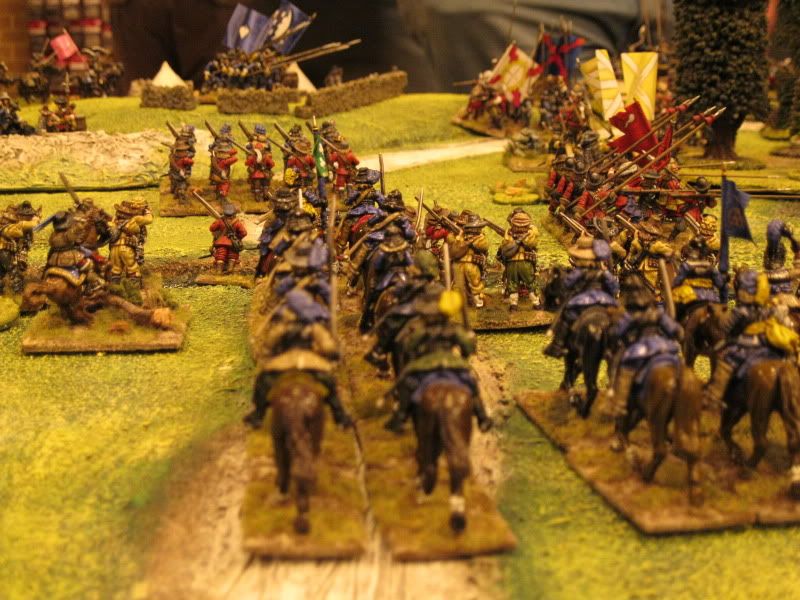
The table was laid out as above, with the river obviously being the main feature. The objective for both sides was to force their way across the river, whilst preventing the opposition from doing the same. There were ostensibly two crossing points (the ford and the bridge) but a third 'secret' crossing point was also available for the Swedes via the marsh on the Imperial right flank.
As mentioned previously we came up with a different scenario this time round, and used most of the existing terrain boards with only the addition of a couple of extra river sections. I apologise in advance for the poor lighting of the photos!
 |
| The table viewed from the Swedish side |
 |
| From the Swedish left flank |
 |
| And the Swedish right flank |
 |
| Finally, the view from the Imperial side (sort of...) |
The table was laid out as above, with the river obviously being the main feature. The objective for both sides was to force their way across the river, whilst preventing the opposition from doing the same. There were ostensibly two crossing points (the ford and the bridge) but a third 'secret' crossing point was also available for the Swedes via the marsh on the Imperial right flank.
We used the Black Powder rules from Warlord Games for the battle; it was only our third or fourth outing with them, so we were expecting a few mistakes along the way.
Failed command rolls would become a regular feature as the game wore on; the advance of the Swedish infantry was incredibly slow, due in part to the pile-up of units, but also due to not rolling low enough to allow sufficient moves. If the Command rolls had been better, the Imperials would really have been in trouble! As it was, they had time to get a few units in position to contend the crossing, although they were plagued by poor Command rolls themselves.
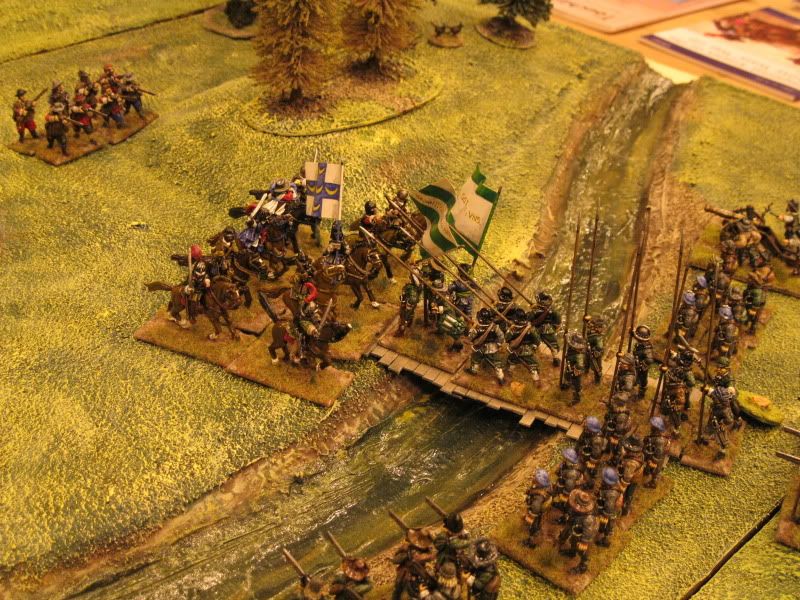
Finally, a breakthrough came at the ford as the Swedish Blue pikemen made a successful three-move charge across the river and into the Imperial musketeers guarding the crossing. They smashed the musketeers aside, but were then faced with a difficult choice; whether to fall back and hand the initiative to the Imperials, to stand still in the face of cannon fire and muskets, or to advance even further into Imperial lines unsupported. In the end they bravely (foolishly?) advanced as far as they could towards the cannon directly ahead of them, hoping to suffer few casualties before charging the following turn.
Meanwhile, on the right flank, the ambitions of the Imperial cavalry were continually thwarted by the Schlammersdorf regiment. Finding themselves stuck on the bridge in much the same way as Hepburn's Scots (failing their Command roll four turns in a row!), they nevertheless managed to hold off repeated cavalry charges despite being out of formation and disordered.
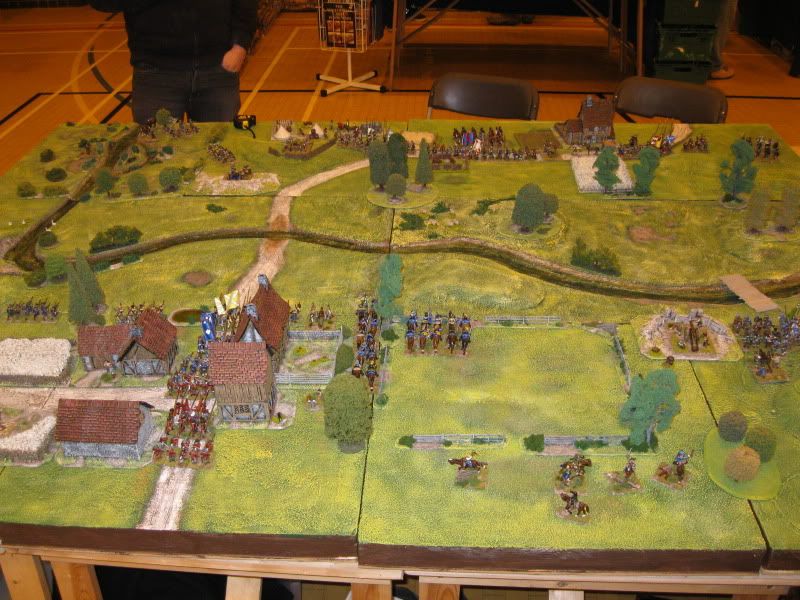 |
| The forces take up their positions |
The game began with mixed fortunes for both sides; the Swedish cavalry got off to a flying start and began racing towards the marsh on the Swedish left flank. The Swedish infantry in the centre got off to a slow start as they made their way to the ford. The Swedish right, held by Hepburn's Scots and Schlammersdorf's regiment, didn't get off to a start at all as they failed their command roll.
The Imperials suffered even worse, managing only to move a single regiment in their first turn before the rest of the army was halted by a failed command roll.
 |
| The Swedish cavalry brigade begin their charge down the left flank; unbeknown to the Imperial commander, the marsh was in fact fordable |
 |
| Meanwhile, the Swedish infantry begin their (slow) advance to cross the ford |
Failed command rolls would become a regular feature as the game wore on; the advance of the Swedish infantry was incredibly slow, due in part to the pile-up of units, but also due to not rolling low enough to allow sufficient moves. If the Command rolls had been better, the Imperials would really have been in trouble! As it was, they had time to get a few units in position to contend the crossing, although they were plagued by poor Command rolls themselves.
Meanwhile, on the Swedish right, things were really stalling - Hepburn's Scots managed two turns of failed Command rolls and found themselves in the middle of the bridge, disordered and charged by Imperial cavalry. Needless to say, they were quickly routed. However, the Schlammersdorf regiment was there to take up the position vacated by the Scots.
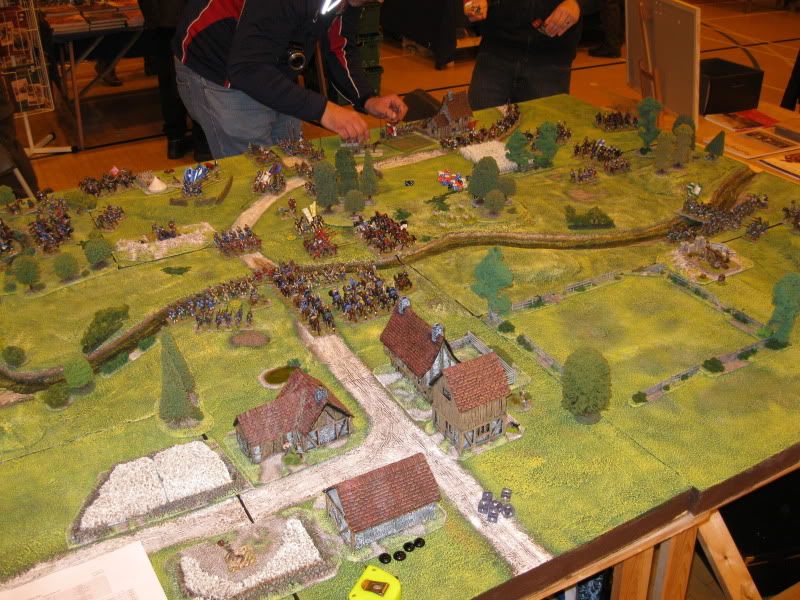 |
| The pile-up at the ford |
Finally, a breakthrough came at the ford as the Swedish Blue pikemen made a successful three-move charge across the river and into the Imperial musketeers guarding the crossing. They smashed the musketeers aside, but were then faced with a difficult choice; whether to fall back and hand the initiative to the Imperials, to stand still in the face of cannon fire and muskets, or to advance even further into Imperial lines unsupported. In the end they bravely (foolishly?) advanced as far as they could towards the cannon directly ahead of them, hoping to suffer few casualties before charging the following turn.
 |
| View from the Swedish rear; you can just see the Swedish Blue pikemen in the distance after their successful breakthrough |
Luckily, the Swedish Blue's breakthrough proved to be the opening the Swedes needed. They were shortly followed by the Swedish Yellow and Red regiments and the Imperial lines began to crumble. Yet there was another twist of fate, as the Imperial reinforcements chose this moment to show up just in time to face off against the (slowly) rampaging Swedes.
 |
| Finally, the Swedes get the majority of their force across the river, just in time to join up with the flanking cavalry force |
 |
| Meanwhile, on the Swedish right, the Schlammersdorf regiment continue to frustrate the Imperial cavalry |
The battle continued for just a couple more turns, but it was clear that the Swedes had won a convincing victory. They had claimed two of the crossing points comprehensively, had denied the other to the Imperials, and in the end had broken two Imperial brigades for the cost of just two regiments of pikemen. Another Swedish victory!
Saturday, 8 December 2012
A Brief Interruption
Well, this isn't the post I intended to make. Following on from my last post, last Sunday was the occasion of Wargamer 2012. We put on our latest game, and I had intended to show off a few pics and ramble a bit about how the day went.
I also had updates on the Mines of Moria game boards, progress with more LotR figures, the return of Da Warpath's annual Advent Challenge, and a few other "surprise" posts lined up.
All those plans stalled though when, on the journey home from Wargamer last week, I managed to lose my camera in a lay-by when we pulled over to drop off passengers. Naturally, I was more than a little miffed when I discovered the loss of the camera, as it had all the the pictures of the Wargamer show, as well as all the pictures of all the other stuff I'd been up to on it!
BUT! Through a series of very fortuitous events, my camera has been found! I won't bore you with all the details, but it turns out the camera was picked up by the son of someone who knows my parents. They managed to identify that the camera belonged to me (through seeing some of the pictures on the camera, of my family at the Olympics this year) and so the camera eventually made it's way to my parent's house.
I still have to go and pick the camera up, but I'm mightily relieved that it's been found and that I still have all the pictures I took. And so, when I get the camera back, I'll be able to post all this stuff I've been planning after all!
Subscribe to:
Posts (Atom)