Wednesday 30 November 2011

Trees and Hedges and Planes! Oh my!

Been working steadily on the trees and hedges for the TYW table this week. Less than two weeks to go now!


The tree bases started off as circles of card, with smaller circles in the centre to get a bit of elevation. The bases were then painted with Scorched Brown (the closest match I've got to the Bitter Chocolate paint we've used on the rest of the boards). Railway ballast applied, and then another coat of Scorched Brown finishes them off. We'll probably give them a drybrush of the Nutmeg Spice colour to blend them with the wood templates, but other than that they're pretty much done.


The hedges were even simpler. Bases cut from bass wood, with the edges cut and sanded to give a chamfered edge and the ends rounded to prevent warping. The bases were then painted Scorched Brown, ballast was added before another coat of Scorched Brown. The final picture shows what they'll look like with the hedges attached! These will probably need a bit more than the Nutmeg Spice to finish - they need to blend into the grass (rather than the wood templates) so will need green and yellow adding in the same way as the boards.

And now for something completely different - I've finally got round to carrying on with the planes for my Dystopian Wars fleet. I wasn't happy with the green or red schemes in the end, and instead a "sea grey" was suggested. I thought that would fit in much better with the metallic look of the ships, so I got hold of some Vallejo Pale Grey Blue (my first Vallejo paint, and I already like them better than GW...) and painted the two Doncaster Bombers and the ten Fighter Tokens


Much better than either green or red in my opinion. They're slightly bluer than a real sea grey, but that's fine. As I plan on giving them a wash of Badab Black (the Bombers at least) that will darken them down a bit. I'm a bit wary that the black wash will make them too dark so it will be a bit of trial and error. The worst that can happen is that I'll have to repaint the grey, which isn't too much hassle...

Thursday 24 November 2011

All Quiet On The Blogging Front...

Phew! Been a while hasn't it? But fear not - I'm back, and with pictures!

Even though I've not made a post for a while it's not because I've not been doing anything. Progress on the TYW table is storming along, and we're well on the way to getting it finished in time for the Wargamer show on 11th December (just 17 days to go!)

So, carrying on from where we left off: between Sunday 6th and Sunday 13th, Gary finished off texturing the rest of the boards and gave them all the first coat of paint: a "Bitter Chocolate" (from Homebase I think...). Gary also started on the roads, giving them their basecoat (a Mid Stone colour if I remember correctly).

Sunday 13th came (after the Remembrance Service in the morning) and we started with the second coat of paint; a heavy drybrush of "Nutmeg Spice", again from Homebase! While Gary started drybrushing the boards, I began painting the river and stream


The water sections were largely experimentation - we went through a box of Gary's watercolours and acrylics and picked out ones we thought might be appropriate. The basic scheme was a basecoat of dark green, a mid-layer of mid green in two strips near the banks (leaving the central channel as dark green) and then a further 'highlight' layer of a light green. All blended in and looking suitably waterlike, if a bit too turquoise-y and "clean". Naturally, Gary couldn't resist playing and he started adding yellow. Soon enough the whole thing looked like a chemical spill, but he managed to correct it and get the yellow to blend nicely with the green. Still quite green, so we'd be adding Devlan Mud into the mix to darken it down and bring all the colours together.

While the boards were drying, Gary started work on the first redoubt while I got on with building the wood sections. The redoubt started out as a base of thick card (mounting board) and a few offcuts of dowel. A few more bits of card were used to raise the dowel off the base, and Gary found a few metal gabions to add


Some lollypop sticks, coffee stirrers and lots of wood filler later, a redoubt was born!


Meanwhile, I started on the woods. The bases are made from hardwood, and we sort of cheated by utilising the bases from Gary's existing scenery pieces. To get them looking like they belonged though we were going  to go through the same process as with the boards themselves. The edges of the templates were trimmed slightly to give a chamfered edge, the bases were PVA'ed and covered in railway ballast, and when that was dry they were given the same basecoat of "Bitter Chocolate"


You'll notice that for the most part, there's a distinct lack of trees. That's because we've decided to do the majority of the trees on separate bases, so that we can have the option of removing them during play.

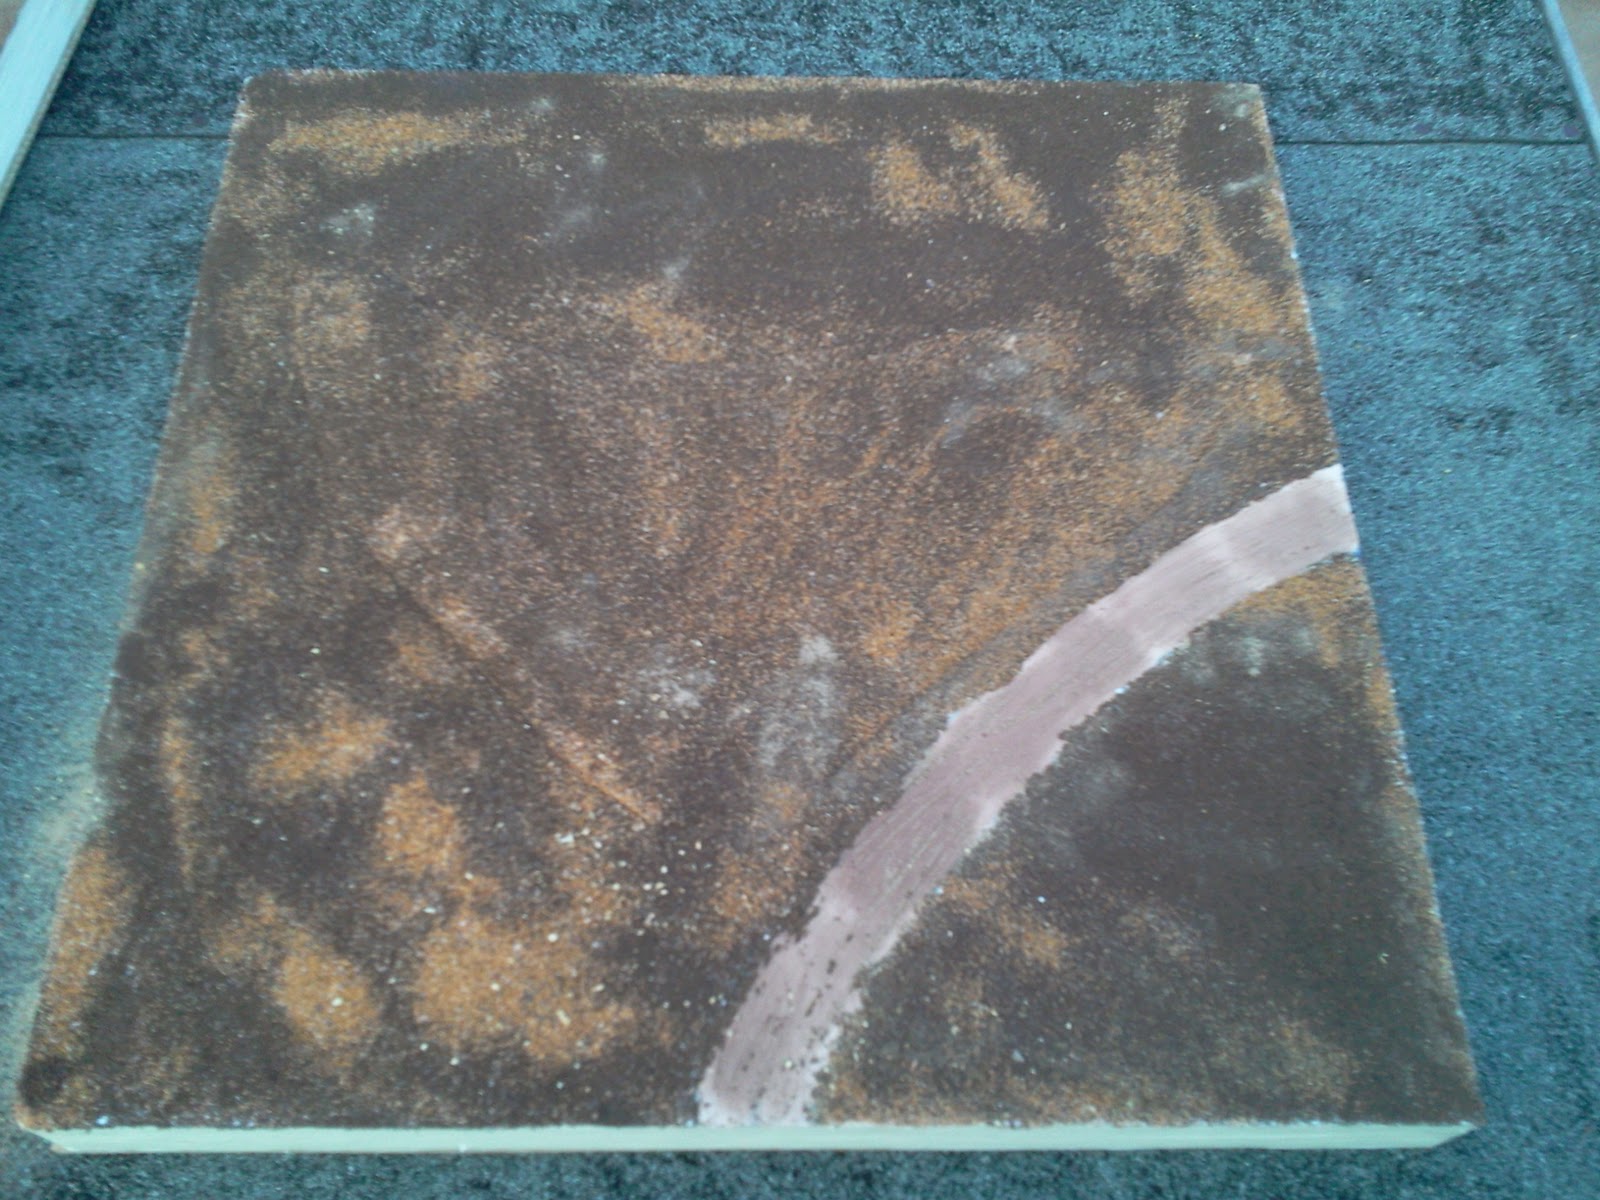
That concluded Sunday's meeting. We managed to squeeze in a Thursday session as well on the 17th and we started on the next layer of paint for the boards, this time the first green. This was a "Woodland Fern 1" (this time from B&Q!)


As you can see, we left a few patches of the original texture showing through just to add some variety. As well as the boards, the roads were given their second coat of paint, a drybrush of a lighter colour (can't remember which...)

Things all looked pretty garish at this point, and we had our first moment of doubt - was the green too light? It didn't look like it did in the book (Paul Darnell's "Touching History Issue 2" by the way), but we persevered. Being as we had already painted all the boards, it was a bit late to do anything else...

From here, Mr Darnell's book said to go straight from the Woodland Fern to a Warm Yellow, but we tried it and decided it was far too stark a contrast and the yellow far too bright. We quickly agreed that a layer of a brighter green was what was needed, and so we broke out the Goblin Green (having no other suitable colours in any sort of bulk). We tried unsuccessfully to find a similar shade in any of B&Q or Homebase's tester pots, and so we persevered with the GW. Between us, we just about had enough to get all the boards done. It looked decent, but was still too dark for what we wanted.

The next two layers were done on Sunday just gone, and we broke out the yellow. First was a lighter drybrush of the Warm Yellow we were originally 'supposed' to use. This brought the boards out another level, but was still too dark and a bit chalky. So we decided to go up another notch, introduced Yellow Submarine and it all came together.
The transition from start to finish: Woodland Fern 1 (top), Goblin Green
drybrush, Warm Yellow drybrush and a Yellow Submarine drybrush (bottom)

 And we were done!


Well, done with the boards at least. We gave the roads a final drybrush of Ivory and the water sections have now been given wash of Devlan Mud and a few coats of Gloss Varnish. Gary has spent the last couple of evenings adding reeds to the stream and marshy area (just the river to go) and building the second redoubt. I've been working on hedges and trees, all on individual bases. I'll update on those in the next post.

So there we have it! The bulk of the work now done, and with time to spare. We've got 17 days to get everything else sorted: trees, hedges, back scene, redoubt, and then all the other paraphernalia we need for the game (like rules, figures, game info etc.) We're even planning a banner!


Wednesday 9 November 2011

As If We Weren't Mad Enough Already...

...we've decided to take on a rather ambitious project.

You may remember earlier in the year I mentioned that Stafford Games ran a Stalingrad FOW demo game at the Alumwell/WMMS show in March. Even earlier than that, I posted about the Firestorm Armada demo game we ran at the Wargamer show in Great Barr. Well, after 7 months of demo game silence, we've decided to do it again and mark the anniversary of our inaugural display game performance by taking another display game to Wargamer 2011.

There are a few things that make this more ambitious than our previous attempts though. Firstly, we've decided to run a Thirty Years' War game, which requires a boatload of figures and a boatload of terrain. Secondly, Wargamer is only five weeks away (11th December). Thirdly, there are only two of us...

Fortunately, the figures are already pretty well catered for by my partner-in-crime, Gary (whose figures can be seen in my post on the opening of the Midlands Wargames Centre). So that just leaves the terrain!

The Scenario


We'll be adapting the Nine Years' War battle of Steenkerque, 1692, by backdating it fifty or so years and Germanising the name to "Steinkirche". Instead of French and Anglo-Dutch, the forces will naturally be the TYW protagonists of Swedes and 'Imperials'. One or the other armies (we haven't decided which, yet) is encamped and besieging the nearby town, unaware that the opposing army has the element of surprise and is marching upon them in a dawn attack on the encampment.

The Plan™


We're building a 8'x6' table, made up of 2'x2' modular tiles and two 4'x2' sections for the major features (the river, and the encampment). Each board is 50mm polystyrene mounted on 6mm MDF, and taped around the edges for a pretty sturdy set of tiles.


Here's the table all marked out as of last Friday. As you can see, Gary had already failed his Impetuosity test and had carved out the river before I'd even got there. Friday came and went in a blur of not-much-progress (at least until I'd left - coincidence?). We also didn't entirely stick to the plan, but the old adage about no plan surviving contact holds true. Anyway, we decided to reconvene on Sunday and continue.


The state of the boards (well, some of them) at 10am Sunday morning. Gary had been busy adding all of the hills from 25mm polystyrene during Friday afternoon and Saturday, and the boards were beginning to at least resemble the plan. Sunday then was spent filling the roads and rivers, and texturing the boards. 


The river and camp boards with roads and river "filled" using
brown powder paint mixed with white filler. 


Texturing was done using railway ballast (medium), sand and sawdust
So that's how we stood at the close of play on Sunday. The equivalent of five 2'x2' sections (three 2'x2' and a 4'x2') textured, ready for painting. That leaves seven more to do (six 2'x2' and the other 4'x2'), some of which are already started, some not at all. The major logistical problems we're faced with at the moment are storage and time; the only days we can both get together and spend the whole day working on the boards are Sundays, unless we can squeeze in a few hours here and there around our respective work schedules. In addition to the terrain boards, we have several woods, a couple of redoubts, "camp" sections (i.e tents), a back-scene to enclose the river board, and a couple more regiments to bulk out the armies all still left to do. Luckily, these are all things that can be done separately and in the hours we can squeeze in whenever we have time. 

Despite all these obstacles and the amount of work to do, we're both optimistic and enthusiastic! I will happily state that even with this amount of work done (representing a very small portion of the whole, as it does) the project has really got my hobby juices flowing. This is easily the biggest modelling project I've ever done, and I think the bug might have got me...

On a related note, Gary is also (sporadically) going to chart our progress over on his own fledgling blog G's Spot. Well worth a visit (despite the garish combination of pink and sickly green, and the obvious Slaaneshi-Nurglite overtones that could only be the mark of a confirmed heretic!)


Tuesday 8 November 2011

Pirates! ARRRGGGHHH!

After receiving the Man-of-War from Ainsty a couple of weeks ago, I set about building a few pirate models to crew it! I already had a few specific pirate figures from a variety of manufacturers, but not enough to give me the required variety or numbers, so I decided to flesh out my available figures by converting a bunch of GW's Empire Free Company models and a few old Mordheim models I had lying around (with the Mordheim kit essentially being exactly the same as the Free Company kit...)

First up, the manufactured models!

Cap'n Henry Morgan!

Blackbeard-esque chappie

A couple of chaps with pistols, and a musketeer

First Mate and the Quartermaster

Sword and pistol chappies, or Pintel and Ragetti as I call them...
And now for the conversions. First up, a couple of blokes with spears/boarding pikes - very useful (some would say overpowered) in LotHS, a lot more balanced in Cutlass


Next up, a couple with a blunderbuss and a musket. Blunderbusses are largely a one-trick pony, but are lethal (in theory at least). Muskets are always useful for providing a bit of longer range firepower (providing they hit anything...)


More chappies with cutlass and pistol; these form the mainstay of most crews. 


A couple more with just cutlasses; these are the cheap-and-cheerful crew members, usually just added to bulk out the numbers of the crew and add a bit of strength in melee.


And finally, Pistol Pete - I built him as a sort of secondary captain, or as a First Mate in a larger crew. 


So there we go. I've got loads more bodies available for converting but I've now run out of round bases, cutlasses and pistols so I'll have to get hold of a few more bits before I can carry on converting. In the meantime, I'll paint these ones up in between other things (namely finishing the Dystopian Wars ships...)