Less than a week to go (three days, in fact) until the Wargamer show on Sunday 11th. We've made good progress over the past couple of weeks, and got another session on Sunday just gone. The boards are finished. The trees, woods and hedges are finished. The redoubts (two of them) are finished. We've got handouts (details of the game, and details of the group) printed and ready. The figures are almost finished (just some Imperialist pikemen to finish painting as of Sunday).
That leaves Gary with the camp pieces, and me with the backscene to do.
We planned on having a 2' section along the short edge of the river board (where the river leaves the board) and a 4' section along the long edge where the town of Steinkirche (the namesake of our battle) would be. After a bit of discussion, we decided to cut this down to two 2' sections instead (meaning I only have to paint 4' of backscene rather than 6').
While I was at Gary's on Sunday we began sketching out the scenes themselves onto the sections of mounting board. We decided on using watercolours and I've been making progress with the painting over the past couple of days.
Still a work-in-progress, but not too bad so far I think. I don't claim to be an expert watercolour painter, or a landscape painter at all so I'm pretty happy with how it's turned out (although in some ways, it looks almost childlike, with the bright blue sky and the bright green grass...). Perhaps not as realistic as I'd like, but like I said, I'm not an expert and they're not designed as pieces of artwork or to stand up to close scrutiny. In truth, if we're not happy with them on the day, they can easily be removed - they're not crucial to the game in any way.
In other news, as well as working on the backscene, I've put a few hours over the last couple of evenings into getting some Napoleonic figures based and finished.
Reviewing some of the photos I posted up in the last post, some of my figures look woefully poor compared to Gary's. All those white edges stick out like a sore thumb, and look terrible. Those are all the original batch of Napoleonic figures I painted many years ago, and the choice of basing material was poor to say the least. It's not stood up well at all to the rigours of handling, being a less than sturdy thin cardboard (think cereal box thin). Once I've finished the current batch (only eight bases of Dragoons and eight bases of Voltigeurs to go) I think I'll have to go back and tidy the older bases up, or maybe even rebase them completely. We'll see...
A blog in which I chronicle my attempts to reduce the mass numbers of unpainted models in my possession, as well as wax lyrical about random whatnots...
Showing posts with label Napoleonics. Show all posts
Thursday, 8 December 2011
Friday, 2 December 2011
One Year On...
It's been exactly a year since I started this blog (almost to the minute!) 56 posts, which works out at very slightly over 1 post a week (which is what I was aiming for!) Of course, the reality is a bit different given that some of those posts have been weeks apart, but on the plus side it means there is plenty of room for improvement. Bring on the next twelve months!
In other news, I managed to take a few snaps of a Napoleonic game me and Gary had last week at the club. No battle report but suffice it to say that it was a narrow loss for me (one more turn, and it would have quickly turned to a major loss I think, but we can gloss over that fact...)
French vs. Austrians as always. If Paul gets his act together and gets his Russians painted, we'll have another army to use. I have a feeling I'll manage a second army myself by the time that comes around though...
P.S Looking at the pictures reminds me that I've still got unbased elements. I did pick up some Basetex at the Derby show in October so I really should get round to doing these...
Thursday, 14 July 2011
'Counter Attack at the Bridgehead'
After much delay, I can finally post the next Napoleonic battle report!
The fourth game in our Napoleonic mini-campaign was played before I went off on holiday (just about three weeks ago now...), and for the first time in the campaign I was the aggressor! So far I've been on the back foot, facing whatever the Austrians could throw at me with whatever minimal and hastily-gathered forces I had available, but this was my chance to take the fight to the enemy!
The scenario this time took the action back to the small and (previously) peaceful village of Fleur. You may remember the first game where the Austrians were aiming to force a bridgehead against the French garrison. Well this time, it's the French who are trying to force the bridgehead but rather than trying to prevent the Austrians getting in, I was now trying to stop them leaving!
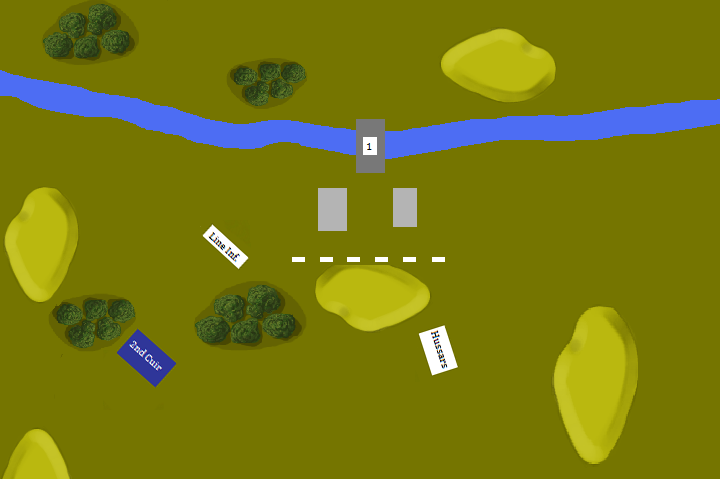
The board was set out much like the first game (as you'd expect - good job we took photos or we'd never have remembered what it looked like!), except this time with more of the "French" side on show to allow for manoeuvres.
The French forces were made up of fresh troops, marched urgently from the northern training camps upon hearing the news of the Austrian invasion. Commanded by General de Lude, they consisted of a squadron of Cuirassiers, three Line Battalions and two medium artillery pieces.
The Austrians, meanwhile, had only what had been left behind after the first battle at Fleur as a rearguard. This gave them a squadron of Hussars, a Line Battalion, a Grenzer/Jager battalion and a single artillery piece. Alas, my inability to cause casualties in the first game came back to haunt me as the forces were more or less even. To make matters worse, there was the pervading threat of the main Austrian army arriving at some point on their way back from St Michel. Needless to say, time was of the essence for the French. The bridgehead had to be secured before nightfall, and before the main Austrian force arrived to sweep my meagre resistance aside once again.
Deployment was commenced with the Austrians having to set up all forces and assign orders before the French entered the field. I had the advantage of seeing the Austrian deployment, but was restricted to deploying in the valley between the two hills. At the start of the game, only my advance unit of cavalry was available - the footsloggers and guns would show up on Turn 3. The Austrians, clearly unaware of where the French would approach, set up in a general perimeter around the village with the cannon guarding the bridge (despite twice informing my opponent that the cannon could not see over the buildings - leaving it with a very limited arc of fire!)
Turns 1 and 2 began in unspectacular fashion - general advances with the Austrian light infantry maintaining their central position while the Hussars and Line Battalion advances towards the Cuirassiers.
Turn 3 got things off with a bang; the three French Line Battalions showed up in the valley, along with the artillery, and the Cuirassiers made the first charge of the game against the Austrian Line who elected to stand and shoot rather than attempt to form square. With some very jammy dice rolling, it paid off and the Cuirassiers were forced to retreat in ignominy.
Turns 4 and 5 saw the situation quickly restored, with the Cuirassiers once more launching themselves at the Austrian Line, this time with the direct support of General de Lude himself! His inspiring presence must have done the trick, and the Austrian Line pushed their luck too far by electing again not to form square and they paid for it. The Cuirassiers pursued them right up to the river, just failing to catch them (by 1/2"!). This left them in a bit of a predicament with the Austrian cannon now staring them straight in the face.
Meanwhile, the Hussars began their harassment of the lone Line Battalion, forcing them in to square and halting the advance. The other two Battalions continued their march forward towards the village, with the Austrian Grenzer reformed to plug the gap left by their fleeing compatriots.
Turns 6 and 7 saw the inevitable bombardment of the Cuirassiers, who duly fled only to once again benefit from General de Lude's direct involvement to rally them. Unfortunately, the Austrian Line infantry also managed to rally with the assistance of the Austrian General. Meanwhile, the Hussars continued to frustrate the French infantry battalion, so much so that a second battalion was diverted away from the village to deal with them.
Turn 8 saw much manoeuvring (accompanied by many a confused look on the umpire's face, as he wondered what the hell I was doing!) All I can say is that I knew what I was doing, and it sort of worked. While the 6th Line marched between the woods to see off the Hussars, the Cuirassiers marched across the front of the 5th Line Battalion to take up the vacated position previously occupied by the 6th and line up ready to launch a charge into the Grenzer. Meanwhile, the French artillery finally took up firing positions alongside the 5th Line, and opened fire on the Austrian Line.
Turn 9, and the Cuirassiers launched their charge against the Grenzer who also elected to stand and shoot rather than form square. Once again, it didn't work and the Cuirassiers struck home with predictable results. Even better, the Grenzer fled straight back across the bridge and prevented the cannon from firing! The Austrian position was looking tenuous, and there were anxious glances at the umpire and questions. Where was the rest of the Austrian army?!
Unfortunately, the tables quickly turned. Success against the Grenzer left the Cuirassiers open to a counter charge by the Hussars, and with the casualties sustained thus far the Cuirassiers were unable to stand up to the Austrians. Likewise, the 5th Line also succumbed to the firepower of the Austrian infantry and artillery and fled the field.
The Hussars then took up position in the village, ready to face off against the two remaining French infantry battalions, who advanced onto the hill each forming square alternately. Meanwhile, the Austrian infantry marched against the French artillery, taking casualties along the way.
Turn 14, and in an attempt to force the situation, the Hussars charged the infantry squares. Taking fire as they came in, they luckily managed to break the square but were unable to catch them. Meanwhile, the combined fire of the cannon and Line infantry put paid to one of the French artillery pieces.
Turn 15, and the French artillery had inflicted enough casualties to break the Austrian infantry, who fled towards the bridge. The Hussars charged the infantry square again and this time they were beaten and broken for good, leaving a single cannon defending Fleur. Victory was within my grasp, and the Austrian army was nowhere in sight!
Alas, it was not to be. Turn 15 proved to be the last of the game, and night fell just as the French were within reach of the village and the bridge. It also turned out that the Austrian army never did arrive - my opponent had convinced himself that help was on it's way, and this proved not to be the case.
All in all, things are set up very nicely for a climactic finish! Can Frankreich salvage her honour (and oodles of stolen cash) by defeating the Whitecoats before they can make it back across the border? Can Osterreich stop eating sausages long enough to get away with their ill-gotten loot?
The final, thrilling encounter will determine all!!!
The fourth game in our Napoleonic mini-campaign was played before I went off on holiday (just about three weeks ago now...), and for the first time in the campaign I was the aggressor! So far I've been on the back foot, facing whatever the Austrians could throw at me with whatever minimal and hastily-gathered forces I had available, but this was my chance to take the fight to the enemy!
The scenario this time took the action back to the small and (previously) peaceful village of Fleur. You may remember the first game where the Austrians were aiming to force a bridgehead against the French garrison. Well this time, it's the French who are trying to force the bridgehead but rather than trying to prevent the Austrians getting in, I was now trying to stop them leaving!
The board was set out much like the first game (as you'd expect - good job we took photos or we'd never have remembered what it looked like!), except this time with more of the "French" side on show to allow for manoeuvres.
The French forces were made up of fresh troops, marched urgently from the northern training camps upon hearing the news of the Austrian invasion. Commanded by General de Lude, they consisted of a squadron of Cuirassiers, three Line Battalions and two medium artillery pieces.
The Austrians, meanwhile, had only what had been left behind after the first battle at Fleur as a rearguard. This gave them a squadron of Hussars, a Line Battalion, a Grenzer/Jager battalion and a single artillery piece. Alas, my inability to cause casualties in the first game came back to haunt me as the forces were more or less even. To make matters worse, there was the pervading threat of the main Austrian army arriving at some point on their way back from St Michel. Needless to say, time was of the essence for the French. The bridgehead had to be secured before nightfall, and before the main Austrian force arrived to sweep my meagre resistance aside once again.
Deployment was commenced with the Austrians having to set up all forces and assign orders before the French entered the field. I had the advantage of seeing the Austrian deployment, but was restricted to deploying in the valley between the two hills. At the start of the game, only my advance unit of cavalry was available - the footsloggers and guns would show up on Turn 3. The Austrians, clearly unaware of where the French would approach, set up in a general perimeter around the village with the cannon guarding the bridge (despite twice informing my opponent that the cannon could not see over the buildings - leaving it with a very limited arc of fire!)
Turns 1 and 2 began in unspectacular fashion - general advances with the Austrian light infantry maintaining their central position while the Hussars and Line Battalion advances towards the Cuirassiers.
Turn 3 got things off with a bang; the three French Line Battalions showed up in the valley, along with the artillery, and the Cuirassiers made the first charge of the game against the Austrian Line who elected to stand and shoot rather than attempt to form square. With some very jammy dice rolling, it paid off and the Cuirassiers were forced to retreat in ignominy.
Turns 4 and 5 saw the situation quickly restored, with the Cuirassiers once more launching themselves at the Austrian Line, this time with the direct support of General de Lude himself! His inspiring presence must have done the trick, and the Austrian Line pushed their luck too far by electing again not to form square and they paid for it. The Cuirassiers pursued them right up to the river, just failing to catch them (by 1/2"!). This left them in a bit of a predicament with the Austrian cannon now staring them straight in the face.
Meanwhile, the Hussars began their harassment of the lone Line Battalion, forcing them in to square and halting the advance. The other two Battalions continued their march forward towards the village, with the Austrian Grenzer reformed to plug the gap left by their fleeing compatriots.
Turns 6 and 7 saw the inevitable bombardment of the Cuirassiers, who duly fled only to once again benefit from General de Lude's direct involvement to rally them. Unfortunately, the Austrian Line infantry also managed to rally with the assistance of the Austrian General. Meanwhile, the Hussars continued to frustrate the French infantry battalion, so much so that a second battalion was diverted away from the village to deal with them.
Turn 8 saw much manoeuvring (accompanied by many a confused look on the umpire's face, as he wondered what the hell I was doing!) All I can say is that I knew what I was doing, and it sort of worked. While the 6th Line marched between the woods to see off the Hussars, the Cuirassiers marched across the front of the 5th Line Battalion to take up the vacated position previously occupied by the 6th and line up ready to launch a charge into the Grenzer. Meanwhile, the French artillery finally took up firing positions alongside the 5th Line, and opened fire on the Austrian Line.
Turn 9, and the Cuirassiers launched their charge against the Grenzer who also elected to stand and shoot rather than form square. Once again, it didn't work and the Cuirassiers struck home with predictable results. Even better, the Grenzer fled straight back across the bridge and prevented the cannon from firing! The Austrian position was looking tenuous, and there were anxious glances at the umpire and questions. Where was the rest of the Austrian army?!
Unfortunately, the tables quickly turned. Success against the Grenzer left the Cuirassiers open to a counter charge by the Hussars, and with the casualties sustained thus far the Cuirassiers were unable to stand up to the Austrians. Likewise, the 5th Line also succumbed to the firepower of the Austrian infantry and artillery and fled the field.
The Hussars then took up position in the village, ready to face off against the two remaining French infantry battalions, who advanced onto the hill each forming square alternately. Meanwhile, the Austrian infantry marched against the French artillery, taking casualties along the way.
Turn 14, and in an attempt to force the situation, the Hussars charged the infantry squares. Taking fire as they came in, they luckily managed to break the square but were unable to catch them. Meanwhile, the combined fire of the cannon and Line infantry put paid to one of the French artillery pieces.
Turn 15, and the French artillery had inflicted enough casualties to break the Austrian infantry, who fled towards the bridge. The Hussars charged the infantry square again and this time they were beaten and broken for good, leaving a single cannon defending Fleur. Victory was within my grasp, and the Austrian army was nowhere in sight!
Alas, it was not to be. Turn 15 proved to be the last of the game, and night fell just as the French were within reach of the village and the bridge. It also turned out that the Austrian army never did arrive - my opponent had convinced himself that help was on it's way, and this proved not to be the case.
All in all, things are set up very nicely for a climactic finish! Can Frankreich salvage her honour (and oodles of stolen cash) by defeating the Whitecoats before they can make it back across the border? Can Osterreich stop eating sausages long enough to get away with their ill-gotten loot?
The final, thrilling encounter will determine all!!!
Thursday, 9 June 2011
Form Line!
Just thought I'd show you a few Frenchies. I painted these up for the third game of the Raid on St Michel campaign. It's the most single-minded I've been about a project for a while. I know some of you are probably thinking "What's he on about, it's only seven bases?!" but this represents the most painting I've done for at least a month! It just goes to show what a few regular games can do for motivation. Now I'd better arrange some games with my Skaven to get them painted!
Monday, 6 June 2011
The Battle of St Michel
Last weekend we played the third game of our narrative Napoleonic campaign, the Raid on St Michel.
Game Three - The Battle of St Michel
This was by far the biggest battle of the campaign so far, and appropriately so given that this scenario is also the crux of the campaign. The Austrians have fought through the French resistance to finally reach St Michel, where the French treasury is located. The French have amassed forces to make a stand defending the town, and so it was that Marshal Du Bious found himself in command of the defenders.
The task was relatively simple - stop the Austrians taking the town.
The Austrians were arriving on the north side of the table, with the French defending the town on the south side. The town itself consisted of the churchyard (left of the road) and a group of houses (south and right of the road). On the left flank the road led away over a bridge spanning the river, while on the right the road led through a valley.
Because I was defending, my deployment zone was extended to cover the whole of the town and up to the beginning of the river. Any units not in plain sight could be deployed as hidden, with orders to reveal in certain circumstances, or when sighted by the enemy. The Austrians had to deploy by map without seeing the disposition of the French forces, and were allowed to start up to 6" in from the north board edge in column.
The rest of the Austrian forces started backed up along the road, but it wouldn't be long before they turned up! The white 'H's show which units were hidden at the start of the game.
The opening turns were relatively uneventful - my Cuirassiers and Chasseur á Cheval advanced to the top of the hill on the right flank, while the Light Infantry and 4th Line advanced alongside them with the Line taking up position along the ridge of the hill and the Light deployed in skirmish formation at the bottom of the hill.
Meanwhile, the Austrians advanced along the front - the infantry and artillery marched quickly down the road, while the cavalry on both flanks advances also; the Dragoons and Hussars (followed up by three infantry units) moved to take on the Cuirassiers and Chasseur; the Kuirassiers and Austrian Chevaux-Leger moved into what they thought was the empty French left flank. By the time they realised their mistake, it was too late...
It didn't take long for battle to be joined. In the centre, the Austrians had brought the majority of their infantry to bear, while the cavalry tried to break through the flanks. As you can tell from the deployment, I was expected a much stronger push on the left flank; as it turned out, the Austrians were going for a left-hook instead of the right-hook I'd anticipated!
With the Austrian cavalry on my left in trouble, I immediately took my chance and charged with both the Dragoons and the Bavarian Chevaux-Leger. The Austrian cavalry was hit in both the front and flank - much to my shock and horror though, they not only managed to hold but they fought off both charging units! Needless to say, that didn't go to plan. On the right flank, things didn't go much better. My Cuirassiers charged and broke the Austrian Dragoons, but my Chasseur á Cheval were broken in turn my the Austrian Hussars. In the centre the French artillery began their pounding of the Austrian infantry, ably assisted by the militia and 2e Line.
The following few turns formed the climax of the battle. On the left, the Bavarians rallied and ploughed into the Austrian Chevaux-Leger again, this time beating them and causing them to flee. Unfortunately, this left the Kurassiers with a clear charge into the Bavarians and they were routed in return. Meanwhile, the Light and Line moved up to enfilade the Kurassiers as they charged in, causing casualties but not enough to break them. On the right, the Cuirassiers charged and broke the Dragoons again but were then left facing two infantry squares, with the Jager providing enfilade fire. This all proved too much for them and, unable to repeat the performance at Peche Valley, they were routed. Meanwhile the Hussars followed up the Chasseur and broke them a second time, causing them to rout off table and leaving the Hussars dangerously to the rear of my infantry on the hill. The three Austrian infantry units advancing on the hill took heavy casualties on the march in; the Gyulai regiment were forced to retire, quickly followed by the Jordis, but the Splenyi managed to march through the fire and charge through the Light Infantry, who retreated to the far side of the hill.
In the centre, the 2e Militia finally broke and ran from the incoming artillery and infantry fire; the 2e Line marched forward to take up their place holding the road junction. The Austrian Grenadiers took massive casualties and were routed by artillery fire, and the Duke regiment suffered just as badly when the 2e Line got into position. Unfortunately, by this point the 1e Line had been forced to retreat after coming under fire from the advancing Hoch-und-Deutschmeister regiment.
With casualties mounting up and units fleeing all over the place, the battle was coming to its conclusion. On the left, the Kurassiers turned and charged the 3e Line despite suffering casualties on the way in. The Line broke and ran, but conveniently left a gap for the rallied Dragoons to charge through into the Kurassiers. This time, the Kurassiers broke and fled for good, having been reduced to below half strength. On the right, the Cuirassiers launched a last desperate charge at the Austrian Hussars, only to once again be defeated. This time they were too close to the board edge, and with enemy units all around they routed off table. In the centre, the pressure was becoming too much. The Archduke Charles regiment suffered the fire of the French artillery and 2e Line but returned fire and forced the 2e Line to break in turn. Meanwhile, the Hoch-und-Deutschmeister unit continued to force the 1e Line to retreat and the Klebeck marched forward in the wake of the Archduke Charles regiment. The Splenyi paused at the foot of the hill to exchange fire with the 4e Line, while the Gyulai and Jordis regiments both rallied and returned to the firefight.
The French lines were now looking dangerously thin. The left flank had eventually prevailed and cleared their opposition, but the time it had taken them had left the centre and right to bear the brunt of the Austrian assault and they were quickly crumbling. With no reserves left to plug the gap in the centre, the artillery was looking particularly vulnerable and this proved to be the case, as the Hoch-und-Deutschmeister and Klebeck regiments both charged the fortifications around the cannon and cleared them at bayonet-point. Without artillery support and a drastic shortage of non-running infantry units, it looked like the French had been overcome. On the right flank, the 4e Line were forced into square by the approaching Hussars, while the 2e Light formed column and marched away from the area to try and plug the gap around St Michel. The 1e Line continued their harassment of the Hoch-und-Deutschmeister regiment, while the Militia in the churchyard turned to face the Klebeck and the Dragoons and 1e Light moved to the centre whilst staying out of range of the Austrian artillery. The 3e Line managed to rally before exiting the table, but the 2e were not so lucky and fled the battle.
It was at this point that the game was ended. It was decided that the remaining French forces withdrew in good order, with the exception of the 4e Line who were forced to surrender (surrounded by enemy forces as they were), granting a narrow victory to the Austrians. The Whitecoats had captured the treasury, but had suffered heavy casualties to do so (far higher than the French casualties). Now the question is whether they can make it back to Austria with the money, and more importantly, with their lives. Already reports are coming in of a French force marching rapidly from the north to seize the bridgehead at Fleur once again, in the hopes of stopping the Austrians from crossing...
Stay tuned for Game 4!
Game Three - The Battle of St Michel
This was by far the biggest battle of the campaign so far, and appropriately so given that this scenario is also the crux of the campaign. The Austrians have fought through the French resistance to finally reach St Michel, where the French treasury is located. The French have amassed forces to make a stand defending the town, and so it was that Marshal Du Bious found himself in command of the defenders.
The task was relatively simple - stop the Austrians taking the town.
The Austrians were arriving on the north side of the table, with the French defending the town on the south side. The town itself consisted of the churchyard (left of the road) and a group of houses (south and right of the road). On the left flank the road led away over a bridge spanning the river, while on the right the road led through a valley.
Because I was defending, my deployment zone was extended to cover the whole of the town and up to the beginning of the river. Any units not in plain sight could be deployed as hidden, with orders to reveal in certain circumstances, or when sighted by the enemy. The Austrians had to deploy by map without seeing the disposition of the French forces, and were allowed to start up to 6" in from the north board edge in column.
The rest of the Austrian forces started backed up along the road, but it wouldn't be long before they turned up! The white 'H's show which units were hidden at the start of the game.
The opening turns were relatively uneventful - my Cuirassiers and Chasseur á Cheval advanced to the top of the hill on the right flank, while the Light Infantry and 4th Line advanced alongside them with the Line taking up position along the ridge of the hill and the Light deployed in skirmish formation at the bottom of the hill.
Meanwhile, the Austrians advanced along the front - the infantry and artillery marched quickly down the road, while the cavalry on both flanks advances also; the Dragoons and Hussars (followed up by three infantry units) moved to take on the Cuirassiers and Chasseur; the Kuirassiers and Austrian Chevaux-Leger moved into what they thought was the empty French left flank. By the time they realised their mistake, it was too late...
It didn't take long for battle to be joined. In the centre, the Austrians had brought the majority of their infantry to bear, while the cavalry tried to break through the flanks. As you can tell from the deployment, I was expected a much stronger push on the left flank; as it turned out, the Austrians were going for a left-hook instead of the right-hook I'd anticipated!
With the Austrian cavalry on my left in trouble, I immediately took my chance and charged with both the Dragoons and the Bavarian Chevaux-Leger. The Austrian cavalry was hit in both the front and flank - much to my shock and horror though, they not only managed to hold but they fought off both charging units! Needless to say, that didn't go to plan. On the right flank, things didn't go much better. My Cuirassiers charged and broke the Austrian Dragoons, but my Chasseur á Cheval were broken in turn my the Austrian Hussars. In the centre the French artillery began their pounding of the Austrian infantry, ably assisted by the militia and 2e Line.
The following few turns formed the climax of the battle. On the left, the Bavarians rallied and ploughed into the Austrian Chevaux-Leger again, this time beating them and causing them to flee. Unfortunately, this left the Kurassiers with a clear charge into the Bavarians and they were routed in return. Meanwhile, the Light and Line moved up to enfilade the Kurassiers as they charged in, causing casualties but not enough to break them. On the right, the Cuirassiers charged and broke the Dragoons again but were then left facing two infantry squares, with the Jager providing enfilade fire. This all proved too much for them and, unable to repeat the performance at Peche Valley, they were routed. Meanwhile the Hussars followed up the Chasseur and broke them a second time, causing them to rout off table and leaving the Hussars dangerously to the rear of my infantry on the hill. The three Austrian infantry units advancing on the hill took heavy casualties on the march in; the Gyulai regiment were forced to retire, quickly followed by the Jordis, but the Splenyi managed to march through the fire and charge through the Light Infantry, who retreated to the far side of the hill.
In the centre, the 2e Militia finally broke and ran from the incoming artillery and infantry fire; the 2e Line marched forward to take up their place holding the road junction. The Austrian Grenadiers took massive casualties and were routed by artillery fire, and the Duke regiment suffered just as badly when the 2e Line got into position. Unfortunately, by this point the 1e Line had been forced to retreat after coming under fire from the advancing Hoch-und-Deutschmeister regiment.
With casualties mounting up and units fleeing all over the place, the battle was coming to its conclusion. On the left, the Kurassiers turned and charged the 3e Line despite suffering casualties on the way in. The Line broke and ran, but conveniently left a gap for the rallied Dragoons to charge through into the Kurassiers. This time, the Kurassiers broke and fled for good, having been reduced to below half strength. On the right, the Cuirassiers launched a last desperate charge at the Austrian Hussars, only to once again be defeated. This time they were too close to the board edge, and with enemy units all around they routed off table. In the centre, the pressure was becoming too much. The Archduke Charles regiment suffered the fire of the French artillery and 2e Line but returned fire and forced the 2e Line to break in turn. Meanwhile, the Hoch-und-Deutschmeister unit continued to force the 1e Line to retreat and the Klebeck marched forward in the wake of the Archduke Charles regiment. The Splenyi paused at the foot of the hill to exchange fire with the 4e Line, while the Gyulai and Jordis regiments both rallied and returned to the firefight.
The French lines were now looking dangerously thin. The left flank had eventually prevailed and cleared their opposition, but the time it had taken them had left the centre and right to bear the brunt of the Austrian assault and they were quickly crumbling. With no reserves left to plug the gap in the centre, the artillery was looking particularly vulnerable and this proved to be the case, as the Hoch-und-Deutschmeister and Klebeck regiments both charged the fortifications around the cannon and cleared them at bayonet-point. Without artillery support and a drastic shortage of non-running infantry units, it looked like the French had been overcome. On the right flank, the 4e Line were forced into square by the approaching Hussars, while the 2e Light formed column and marched away from the area to try and plug the gap around St Michel. The 1e Line continued their harassment of the Hoch-und-Deutschmeister regiment, while the Militia in the churchyard turned to face the Klebeck and the Dragoons and 1e Light moved to the centre whilst staying out of range of the Austrian artillery. The 3e Line managed to rally before exiting the table, but the 2e were not so lucky and fled the battle.
It was at this point that the game was ended. It was decided that the remaining French forces withdrew in good order, with the exception of the 4e Line who were forced to surrender (surrounded by enemy forces as they were), granting a narrow victory to the Austrians. The Whitecoats had captured the treasury, but had suffered heavy casualties to do so (far higher than the French casualties). Now the question is whether they can make it back to Austria with the money, and more importantly, with their lives. Already reports are coming in of a French force marching rapidly from the north to seize the bridgehead at Fleur once again, in the hopes of stopping the Austrians from crossing...
Stay tuned for Game 4!
Monday, 16 May 2011
Raid on St Michel
So I mentioned a couple of posts back that three of us are running a small Napoleonic narrative campaign at the club. Thursday just gone we played the second game of five linked scenarios and, as promised, here's the update on things so far
Getting Started
The scenarios themselves are from "Raid on St Michel" by Caliver Books. The scenarios are written for 18th Century gaming, but they're very easily adaptable to any "blackpowder" era. The rules we use for Napoleonic gaming are 'Rank & File' by Crusader Publishing; we like them for the very easy-to-grasp mechanics and 'fast play' style, but there are a whole host of additional and optional rules you can add to flavour and suit the era you're playing. The campaign would be fought between my French and the Austrians (commanded by Paul).
Rank & File uses a system whereby each element/base can take three hits before being removed. As a running campaign, casualties would carry over from each game with units regaining a third of the hits taken between games (so a unit that takes 9 hits i.e. 3 bases would regain one base/three hits before the next game)
Game 1 - The Bridge at Fleur
Your border forces in and around the town of Fleur have noticed increased activity by the Osterreichers over the past day or so. You thought nothing of it, as the sausage-munchers like to pose and the campaign season has not even started.
However, as dawn broke above the sleepy town and your garrison there began to go about their daily business, a sentry, seeing some movement in the gloom over the rivere, sounded the alarm. A half regiment of light cavalry had already gone out on patrol, part east and the other part west along the river. The rest of the garrison was forming up for morning drill, weapons inspection and similar dull, routine stuff. Now alerted to the enemy presence, however, it was clear that an attack was underway and the garrison made ready to defend the town and its precious bridge, whilst sending out couriers to recall the cavalry and to warn the garrison of St Michel to the south.
DEFEND THE TOWN FOR AS LONG AS POSSIBLE! INFLICT MAXIMUM DAMAGE ON THOSE CURSED WHITECOATS!!!
And so my task was laid out - to hold the Austrians off for as long as possible, inflict maximum damage for minimal casualties in return and then fall back in good order. Ably commanded by Brigadier Toutou, I had a regiment of Line, a regiment of Militia, a single artillery piece and a unit of Bavarian Chevau-Leger (light cavalry), half of which were on patrol off table at the start of the game.
Deployment was largely taken out of my hands; the French units had to be positioned in specific areas around the village of Fleur; the militia had to be within the confines of the village itself and nearest the bridge, the gun had to be positioned on the hill behind the village, with the line infantry and cavalry parading in the open space behind the village.
The attackers moved first, and the Austrians entered the field of battle - first on were a unit of Hussars and three infantry units. My moves were very simple; the militia formed into line and moved up to the bridge, the line infantry moved up through the village, while the gun manhandled forward to get closer to the bridge itself.
The next turn saw the Austrian Hussars launch a rash charge across the bridge into the militia; the cannonshot missed, but the militia proved to be surprisingly accurate, killing a base of Hussars and forcing a morale check that was duly failed and the Hussars retired back across the bridge.
The next couple of turns were all about getting into position; the line infantry took up position in front of the bridge, while the militia moved to their left to fire across the river. With the Austrian artillery and heavy cavalry foolishly placed at the rear of the order of march, the task of forcing the breach once again fell to the Hussars. Twice more they charged and twice more they were repelled by the line infantry who had formed square and by the increasinly accurate artillery fire. Meanwhile the militia exchanged fire with the Austrian infantry who had formed up across the river; the militia gave far better than they received, but ultimately the weight of fire proved to great and the militia broke and ran.
Things were looking grim for the French. The returning cavalry patrols were making their way back to the village, but the Austrian Kurassiers and artillery had finally reached the riverbank. The artillery took up position to blast away at the French infantry square while the Kurassiers formed up to launch a charge across the bridge and into the square.
Disaster struck when a stray cannonball somehow managed to strike Brigadier Toutou and seriously wound him. After taking a few casualties from artillery fire, the Kurassiers hit home. The French line finally cracked and ran; the Kurassiers pursued straight into the waiting Chevau-Leger, who held their own in the first round of combat but broke in the second due to sheer weight of numbers. With all the French forces running and their commander out of action, the game was over - the Austrians had broken through.
Game 2 - Rear Guard
The second scenario was fought along a narrow, steep-sided valley; effectively limiting the playing area to a 6' long 2.5' wide corridor, divided by a river along the length of the valley, with a ford at the Austrian end and a bridge at the French end.
This time round, I had a unit of Line, a unit of Light Infantry, a unit of Chasseur á Cheval (light cavalry), a unit of Cuirassiers (heavy cavalry) and two guns. As this was a defensible position, I was allowed to deploy up to halfway up the board, so I took full advantage of the walls and hedges dotted around; the Line infantry deployed behind the wall on the right, with the two artillery pieces immediately to their left in the gap between the wall and the river. To the right of the Line were the Cuirassiers. On the left side of the river, the Light Infantry were deployed behind the hedge while the Chasseur á Cheval were hidden behind the hill, ready to be revealed when the Austrians approached (as part of the scenario rules, I was allowed to declare all out-of-sight units as hidden until I decided to reveal them, or they were sighted).
The Austrian forces for this game were split into two sections; the Advance Guard and the Main Body. The Advance Guard consisted of a unit of Hussars and Kurassiers on the left bank and a large infantry unit and unit of Dragoons on the right bank. A random dice roll at the beginning of the game turned out to mean that the Main Body of the Austrian force would begin entering the table on Turn Four, which happened to be just as the action began. As the forces were entering the board (a whole twelve units of them, giving the Austrians sixteen units in total - compared to my five...) the Hussars on the left bank approached the Light Infantry alongside the Kurassiers and the Chasseur á Cheval were revealed. The Light Infantry fired a volley at the Hussars and caused a couple of hits while the Chasseurs moved up on top of the hill to face off against the Kurassiers. On the right bank, the Austrian Dragoons and my Cuirassiers faced off against each other, with my artillery taking shots at the Austrians as they approached and causing a couple of hits (which would prove to be decisive in the following turn).
The following turn saw the proper action begin and charges were declared - the Dragoons and Cuirassiers met on the far right flank and the Kurassiers and Chasseur met just left of the river. Crucially, the Hussars were forgotten about and failed to make their planned charge. This left the Light Infantry free to fire at them once more, again causing hits and forcing the Hussars to retire in ignominy for their error.
Meanwhile, the two cavalry charges were to ultimately decide the fate of the game. On the right flank, my Cuirassiers ploughed through the Dragoons (thanks in no small part to the hits caused previously by my artillery). They were forced to pursue, which took them into the open ground between the battle lines and still in a position to charge the fleeing Dragoons in the following turn. On the left flank, however, things faired rather more poorly with the Chasseurs being soundly beaten and just escaping being run down by the victorious Kurassiers. While things were going well on my right flank, my left had pretty much collapsed with the Light Infantry left with four cavalry units bearing down on them (not to mention the three infantry units following behind...)
Fortunately, the Austrian cavalry had little interest in the Light Infantry - they were on a time limit, and had to reach the end of the board within a certain number of turns (a fact I was unaware of during the game). This meant my Light Infantry were largely free to reform and harass the flanks of the cavalry units as they passed by while they chased the Chasseurs off the board. Meanwhile on the right bank, my Cuirassiers again declared a charge into the Dragoons who, being as they were already fleeing, were forced to flee again. Unfortunately this left my Cuirassiers in a rather sticky situation - bang slap in front of an infantry line, with a second line to their flank and a formed square behind the first line. Visions of the Scots Greys at Waterloo flashed before my eyes as I foresaw the gory deaths of my elite cavalry at the ignoble hands of grubby Austrian muskets.
Lady Luck had other ideas though it seems. The combined volley from the two infantry lines proved shockingly ineffective (only a single hit) and the Cuirassiers hit home. As expected they ploughed straight through the vulnerable line, who fled, but were now faced with the steady square. Again they were forced to charge, and again they took only a single hit from the incoming fire. They hit home again, and yet another unit broke before them. So far so good, but the Cuirassiers were now about as far from my lines as they could get, with the remaining Austrian units between them and my infantry. Pursuing the fleeing infantry (as well as the Dragoons, who had not managed to rally) off the table gave them a turn's respite from incoming fire.
Meanwhile, back at the other end of the table, the Austrian infantry was finally approaching my lines. The artillery pounded the incoming column into submission and forced them to retire, but the pressure was mounting and the Austrian cavalry on the left bank had secured free passage across the bridge and behind my forces. Fearing that I'd be surrounded and cut off from my retreat, the line regiment reformed and fell back towards the bridge, leaving the artillery for one more turn of firing before they too limbered up and began the retreat.
The game ended with both sides meeting their victory conditions; I had inflicted heavy casualties on the Austrian forces (with five units broken, four of those by the Cuirassiers!) and had managed to retire in good order with the majority of my force wholly intact (including the vital artillery pieces). The Austrians had just managed to achieve their objective; as was revealed to me after the game, the Austrians had 18 turns to get at least two units off the board - they managed it in 17. One more turn of holding the Kurassiers on the left bank could have made all the difference, but it wasn't to be. Still, I was more than happy at the result - I had suffered next to no casualties, my cavalry had ploughed through four units in a row and I had retreated my forces in good order and intact. Roll on Game 3!
In other news...
I was at Vicarage Road today to watch the Rugby Premiership Play-off Semi-final between Gloucester (Yay!) and Saracens (Boo!) The first thing that struck me was how squat the pitch is; very short, and absolutely no width at all. No wonder Saracens have conceded the least number of tries all season! There's absolutely nowhere for teams to run, and Gloucester score a lot of their tries from the wings. Some frankly awful refereeing didn't help matters either - Gloucester were seemingly penalised for everything, while Saracens got off lightly. I don't like to complain about referees and I know every supporter always feels like their team is hard done-by, but I can honestly say that this was one of the worst refereeing displays I've seen all season. That said, we really didn't help ourselves, and it's been the bane of our season - unforced errors all over the shop, schoolboy errors most of them; knock-ons, dropped catches, silly offsides. Luckily, Owen Farrell didn't put his kicking boots on until late in the half, and with five missed penalties (two saved by the uprights), we were probably let off lightly to go in at halftime only 6-3 down. The second half was more of the same. Steve Borthwick was finally given a deserved yellow card (which should have come about half an hour earlier) and the pressure was enough to give us a try and the lead for the first time in the game. Again though, we let ourselves down and gave away another penalty in the final five minutes. Just when we really wanted Farrell to miss, he came good and slotted it home to steal a win, leaving a pretty bitter taste in the mouth. On the performance of the day, Saracens weren't the better team and if it weren't for the unforced errors that have plagued us all season, coupled with a few more refereeing decisions actually going the right way, it would have been a very different result. Still, we can always rely on Leicester to do the job. Normally it would gall me to say it, but - come on Tigers!
Until next time...
Getting Started
The scenarios themselves are from "Raid on St Michel" by Caliver Books. The scenarios are written for 18th Century gaming, but they're very easily adaptable to any "blackpowder" era. The rules we use for Napoleonic gaming are 'Rank & File' by Crusader Publishing; we like them for the very easy-to-grasp mechanics and 'fast play' style, but there are a whole host of additional and optional rules you can add to flavour and suit the era you're playing. The campaign would be fought between my French and the Austrians (commanded by Paul).
Rank & File uses a system whereby each element/base can take three hits before being removed. As a running campaign, casualties would carry over from each game with units regaining a third of the hits taken between games (so a unit that takes 9 hits i.e. 3 bases would regain one base/three hits before the next game)
Game 1 - The Bridge at Fleur
Your border forces in and around the town of Fleur have noticed increased activity by the Osterreichers over the past day or so. You thought nothing of it, as the sausage-munchers like to pose and the campaign season has not even started.
However, as dawn broke above the sleepy town and your garrison there began to go about their daily business, a sentry, seeing some movement in the gloom over the rivere, sounded the alarm. A half regiment of light cavalry had already gone out on patrol, part east and the other part west along the river. The rest of the garrison was forming up for morning drill, weapons inspection and similar dull, routine stuff. Now alerted to the enemy presence, however, it was clear that an attack was underway and the garrison made ready to defend the town and its precious bridge, whilst sending out couriers to recall the cavalry and to warn the garrison of St Michel to the south.
DEFEND THE TOWN FOR AS LONG AS POSSIBLE! INFLICT MAXIMUM DAMAGE ON THOSE CURSED WHITECOATS!!!
And so my task was laid out - to hold the Austrians off for as long as possible, inflict maximum damage for minimal casualties in return and then fall back in good order. Ably commanded by Brigadier Toutou, I had a regiment of Line, a regiment of Militia, a single artillery piece and a unit of Bavarian Chevau-Leger (light cavalry), half of which were on patrol off table at the start of the game.
Deployment was largely taken out of my hands; the French units had to be positioned in specific areas around the village of Fleur; the militia had to be within the confines of the village itself and nearest the bridge, the gun had to be positioned on the hill behind the village, with the line infantry and cavalry parading in the open space behind the village.
The attackers moved first, and the Austrians entered the field of battle - first on were a unit of Hussars and three infantry units. My moves were very simple; the militia formed into line and moved up to the bridge, the line infantry moved up through the village, while the gun manhandled forward to get closer to the bridge itself.
The next turn saw the Austrian Hussars launch a rash charge across the bridge into the militia; the cannonshot missed, but the militia proved to be surprisingly accurate, killing a base of Hussars and forcing a morale check that was duly failed and the Hussars retired back across the bridge.
The next couple of turns were all about getting into position; the line infantry took up position in front of the bridge, while the militia moved to their left to fire across the river. With the Austrian artillery and heavy cavalry foolishly placed at the rear of the order of march, the task of forcing the breach once again fell to the Hussars. Twice more they charged and twice more they were repelled by the line infantry who had formed square and by the increasinly accurate artillery fire. Meanwhile the militia exchanged fire with the Austrian infantry who had formed up across the river; the militia gave far better than they received, but ultimately the weight of fire proved to great and the militia broke and ran.
Things were looking grim for the French. The returning cavalry patrols were making their way back to the village, but the Austrian Kurassiers and artillery had finally reached the riverbank. The artillery took up position to blast away at the French infantry square while the Kurassiers formed up to launch a charge across the bridge and into the square.
Disaster struck when a stray cannonball somehow managed to strike Brigadier Toutou and seriously wound him. After taking a few casualties from artillery fire, the Kurassiers hit home. The French line finally cracked and ran; the Kurassiers pursued straight into the waiting Chevau-Leger, who held their own in the first round of combat but broke in the second due to sheer weight of numbers. With all the French forces running and their commander out of action, the game was over - the Austrians had broken through.
Game 2 - Rear Guard
The second scenario was fought along a narrow, steep-sided valley; effectively limiting the playing area to a 6' long 2.5' wide corridor, divided by a river along the length of the valley, with a ford at the Austrian end and a bridge at the French end.
This time round, I had a unit of Line, a unit of Light Infantry, a unit of Chasseur á Cheval (light cavalry), a unit of Cuirassiers (heavy cavalry) and two guns. As this was a defensible position, I was allowed to deploy up to halfway up the board, so I took full advantage of the walls and hedges dotted around; the Line infantry deployed behind the wall on the right, with the two artillery pieces immediately to their left in the gap between the wall and the river. To the right of the Line were the Cuirassiers. On the left side of the river, the Light Infantry were deployed behind the hedge while the Chasseur á Cheval were hidden behind the hill, ready to be revealed when the Austrians approached (as part of the scenario rules, I was allowed to declare all out-of-sight units as hidden until I decided to reveal them, or they were sighted).
The Austrian forces for this game were split into two sections; the Advance Guard and the Main Body. The Advance Guard consisted of a unit of Hussars and Kurassiers on the left bank and a large infantry unit and unit of Dragoons on the right bank. A random dice roll at the beginning of the game turned out to mean that the Main Body of the Austrian force would begin entering the table on Turn Four, which happened to be just as the action began. As the forces were entering the board (a whole twelve units of them, giving the Austrians sixteen units in total - compared to my five...) the Hussars on the left bank approached the Light Infantry alongside the Kurassiers and the Chasseur á Cheval were revealed. The Light Infantry fired a volley at the Hussars and caused a couple of hits while the Chasseurs moved up on top of the hill to face off against the Kurassiers. On the right bank, the Austrian Dragoons and my Cuirassiers faced off against each other, with my artillery taking shots at the Austrians as they approached and causing a couple of hits (which would prove to be decisive in the following turn).
The following turn saw the proper action begin and charges were declared - the Dragoons and Cuirassiers met on the far right flank and the Kurassiers and Chasseur met just left of the river. Crucially, the Hussars were forgotten about and failed to make their planned charge. This left the Light Infantry free to fire at them once more, again causing hits and forcing the Hussars to retire in ignominy for their error.
Meanwhile, the two cavalry charges were to ultimately decide the fate of the game. On the right flank, my Cuirassiers ploughed through the Dragoons (thanks in no small part to the hits caused previously by my artillery). They were forced to pursue, which took them into the open ground between the battle lines and still in a position to charge the fleeing Dragoons in the following turn. On the left flank, however, things faired rather more poorly with the Chasseurs being soundly beaten and just escaping being run down by the victorious Kurassiers. While things were going well on my right flank, my left had pretty much collapsed with the Light Infantry left with four cavalry units bearing down on them (not to mention the three infantry units following behind...)
Fortunately, the Austrian cavalry had little interest in the Light Infantry - they were on a time limit, and had to reach the end of the board within a certain number of turns (a fact I was unaware of during the game). This meant my Light Infantry were largely free to reform and harass the flanks of the cavalry units as they passed by while they chased the Chasseurs off the board. Meanwhile on the right bank, my Cuirassiers again declared a charge into the Dragoons who, being as they were already fleeing, were forced to flee again. Unfortunately this left my Cuirassiers in a rather sticky situation - bang slap in front of an infantry line, with a second line to their flank and a formed square behind the first line. Visions of the Scots Greys at Waterloo flashed before my eyes as I foresaw the gory deaths of my elite cavalry at the ignoble hands of grubby Austrian muskets.
Lady Luck had other ideas though it seems. The combined volley from the two infantry lines proved shockingly ineffective (only a single hit) and the Cuirassiers hit home. As expected they ploughed straight through the vulnerable line, who fled, but were now faced with the steady square. Again they were forced to charge, and again they took only a single hit from the incoming fire. They hit home again, and yet another unit broke before them. So far so good, but the Cuirassiers were now about as far from my lines as they could get, with the remaining Austrian units between them and my infantry. Pursuing the fleeing infantry (as well as the Dragoons, who had not managed to rally) off the table gave them a turn's respite from incoming fire.
Meanwhile, back at the other end of the table, the Austrian infantry was finally approaching my lines. The artillery pounded the incoming column into submission and forced them to retire, but the pressure was mounting and the Austrian cavalry on the left bank had secured free passage across the bridge and behind my forces. Fearing that I'd be surrounded and cut off from my retreat, the line regiment reformed and fell back towards the bridge, leaving the artillery for one more turn of firing before they too limbered up and began the retreat.
The game ended with both sides meeting their victory conditions; I had inflicted heavy casualties on the Austrian forces (with five units broken, four of those by the Cuirassiers!) and had managed to retire in good order with the majority of my force wholly intact (including the vital artillery pieces). The Austrians had just managed to achieve their objective; as was revealed to me after the game, the Austrians had 18 turns to get at least two units off the board - they managed it in 17. One more turn of holding the Kurassiers on the left bank could have made all the difference, but it wasn't to be. Still, I was more than happy at the result - I had suffered next to no casualties, my cavalry had ploughed through four units in a row and I had retreated my forces in good order and intact. Roll on Game 3!
In other news...
I was at Vicarage Road today to watch the Rugby Premiership Play-off Semi-final between Gloucester (Yay!) and Saracens (Boo!) The first thing that struck me was how squat the pitch is; very short, and absolutely no width at all. No wonder Saracens have conceded the least number of tries all season! There's absolutely nowhere for teams to run, and Gloucester score a lot of their tries from the wings. Some frankly awful refereeing didn't help matters either - Gloucester were seemingly penalised for everything, while Saracens got off lightly. I don't like to complain about referees and I know every supporter always feels like their team is hard done-by, but I can honestly say that this was one of the worst refereeing displays I've seen all season. That said, we really didn't help ourselves, and it's been the bane of our season - unforced errors all over the shop, schoolboy errors most of them; knock-ons, dropped catches, silly offsides. Luckily, Owen Farrell didn't put his kicking boots on until late in the half, and with five missed penalties (two saved by the uprights), we were probably let off lightly to go in at halftime only 6-3 down. The second half was more of the same. Steve Borthwick was finally given a deserved yellow card (which should have come about half an hour earlier) and the pressure was enough to give us a try and the lead for the first time in the game. Again though, we let ourselves down and gave away another penalty in the final five minutes. Just when we really wanted Farrell to miss, he came good and slotted it home to steal a win, leaving a pretty bitter taste in the mouth. On the performance of the day, Saracens weren't the better team and if it weren't for the unforced errors that have plagued us all season, coupled with a few more refereeing decisions actually going the right way, it would have been a very different result. Still, we can always rely on Leicester to do the job. Normally it would gall me to say it, but - come on Tigers!
Until next time...
Tuesday, 3 May 2011
It's been a while...
Well, as predicted back in my last post, things have been pretty hectic over the past two weeks. Now we're all stuffed full of chocolate eggs and are thoroughly sick and tired of royal weddings though, things will hopefully start getting back to normal!
Unfortunately, work has meant that painting and hobby time in general has been non-existent so I don't have anything new to show off. However, there are a couple of new things to talk about
Return of the Tomb Kings
The Tomb Kings are on the horizon with a new army book and a host of new figures. I pre-ordered my copy of the army book, and I was pretty exciting to receive a nicely sized cardboard box from Games Workshop this morning. I just had time for a quite flick through before heading off to work. First impressions are that it's a very nice book in and of itself - lavishly detailed, full colour and (most importantly) a strong hardback cover! I'm hoping to give a more detailed review once I've had time to have a proper readthrough, but so far I'm not disappointed.
War on the Franco-Austrian Border
Yes, I'm talking about Napoleonics. There are plans afoot to run a small narrative "border skirmish" campaign between French and Austrian forces. The campaign will be a series of linked scenarios - unfortunately, I can't remember the exact details of where the scenarios have come from (some magazine/book or other), but I'll find out. Either way, I'm very much looking forward to it. Hopefully, we'll be getting underway this week (the first time I've managed to get down to the club for about two months...). In the meantime, I'm going to try and get a few more troops painted up before the first game! I'll keep you posted...
Unfortunately, work has meant that painting and hobby time in general has been non-existent so I don't have anything new to show off. However, there are a couple of new things to talk about
Return of the Tomb Kings
The Tomb Kings are on the horizon with a new army book and a host of new figures. I pre-ordered my copy of the army book, and I was pretty exciting to receive a nicely sized cardboard box from Games Workshop this morning. I just had time for a quite flick through before heading off to work. First impressions are that it's a very nice book in and of itself - lavishly detailed, full colour and (most importantly) a strong hardback cover! I'm hoping to give a more detailed review once I've had time to have a proper readthrough, but so far I'm not disappointed.
War on the Franco-Austrian Border
Yes, I'm talking about Napoleonics. There are plans afoot to run a small narrative "border skirmish" campaign between French and Austrian forces. The campaign will be a series of linked scenarios - unfortunately, I can't remember the exact details of where the scenarios have come from (some magazine/book or other), but I'll find out. Either way, I'm very much looking forward to it. Hopefully, we'll be getting underway this week (the first time I've managed to get down to the club for about two months...). In the meantime, I'm going to try and get a few more troops painted up before the first game! I'll keep you posted...
Tuesday, 22 March 2011
Another day, another blog post!
Well, after my record time update last weekend, obviously my brain couldn't cope with the possibility of three updates in a single week. But now it's a new week, and it's safe to post again...
In all fairness, I've not actually had much to post about over the past week. Work has resumed and so my painting time has reduced correspondingly. I have managed to make some small progress with a few things though.
First up, the Clanrats:
Not much left to do on them now, but I've not touched them for four or five days.
Next up, a few Napoleonics...
Voltigeurs:
And Cuirassiers:
And now for the reason why they're not finished yet. I'm an idiot.
Let me elaborate. Last weekend was the WMMS wargames show, and I mentioned that I was going to get basing supplies. Well, I did get basing supplies. I just didn't get all the basing supplies. I use Basetex to do all my 15mm bases, and I'd completely forgotten that I needed new pots of the stuff. Hence when I went to pick up the basing supplies, I completely ignored the Basetex and simply bought the magnetic stuff I wanted. Come Monday morning when I wanted to start working on the figures, I was kicking myself.
The next chance I'll get to buy some will be Salute in mid-April, and I'm not 100% sure I'll be going. Failing that, I'll have to order it online and have to wait for it to get here...
In all fairness, I've not actually had much to post about over the past week. Work has resumed and so my painting time has reduced correspondingly. I have managed to make some small progress with a few things though.
First up, the Clanrats:
Not much left to do on them now, but I've not touched them for four or five days.
Next up, a few Napoleonics...
Voltigeurs:
And Cuirassiers:
And now for the reason why they're not finished yet. I'm an idiot.
Let me elaborate. Last weekend was the WMMS wargames show, and I mentioned that I was going to get basing supplies. Well, I did get basing supplies. I just didn't get all the basing supplies. I use Basetex to do all my 15mm bases, and I'd completely forgotten that I needed new pots of the stuff. Hence when I went to pick up the basing supplies, I completely ignored the Basetex and simply bought the magnetic stuff I wanted. Come Monday morning when I wanted to start working on the figures, I was kicking myself.
The next chance I'll get to buy some will be Salute in mid-April, and I'm not 100% sure I'll be going. Failing that, I'll have to order it online and have to wait for it to get here...
Saturday, 5 February 2011
Just a quick one...
Only a short post for now; hopefully a bigger update will be coming on Sunday.
Anyway, life has been a bit hectic since the last update. My grandmother died suddenly, and so there's been a lot going on and the whole family has been a bit out of sorts, naturally.
Napoleonics
As a sort of pick-me-up, my uncle, cousin and myself organised a Napoleonics game during the week to take our minds off things. Austrians vs. French 15mm, with myself commanding the French and my uncle and cousin splitting the Austrians between them (my cousin still hasn't painted his own Russian army...). The game objective was to "Seize the Pass" by controlling a pair of villages along the centre line of the table, each seperated by a stream running the length of the table. It ended up as a losing draw for me; things started off well, as the Austrians bottlenecked on their way to the far village and their cavalry were slowed by marshland on the way to the near village. My light infantry battalion made it to the near village unmolested and held it against all comers (about three strong Austrian infantry battalions and a medium artillery battery) while the Austrian cavalry tried to circle round to my artillery and were held off (and destroyed) by two infantry squares.
The turning point of the battle came when my heavy cavalry charged the loitering Austrian Hussars guarding the far village. I outnumbered the Hussars and had better quality troops. Naturally, I lost the fight and my cavalry retired. The following turn, they charged again (still outnumbering and still better quality) and lost again. As they were already Unsteady, this time they Routed. It was at this point that my three infantry battalions contesting the far village decided to pack up and retire as well; the weight of Austrian numbers was beginning to tell, and the French were gradually pushed back towards the stream.
When we ended the game (due to time), the Austrians held one village and my light infantry held the other. If we'd have carried on, my light infantry would likely have been overwhelmed (although I did have two infantry battalions rushing to support them; the two battalions that had seen off the Austrian cavalry). Still, ending on a draw (even if it would eventually have turned to a defeat) was a fair result.
Other stuff
I managed to complete the entry for Animosity 5's Conversion Contest; photos will follow as soon as the results of the contest are announced.
Da Warpath are currently running a "Crazy Community Unit Project"; the idea is that members sign up to contribute a painted Orc Boy until we've constructed a whole unit! Definitely crazy...
Anyway, I've volunteered to contribute a boy to the project. The bonus is that each member who contributes a painted boy will be entered into a raffle, and the winner wins the whole unit! I'll be starting work on my Boy on Sunday, so will provide (semi-) regular updates of my progress.
In other news, I've started putting together a unit of Giant Rats for my Skaven. The purchase of a sprue of Giant Rats with Packmasters from eBay (all of about £3) in addition to the numerous rats provided on the Doomwheel kit mean I have enough for a unit of 20. Hopefully, they'll be pretty quick to paint - then I suppose I should get started on the mass of Clanrats.
Finally, I'm still plugging away at the Tilean pikemen. Warhammer-Empire.com are planning on running another campaign, set a few years after Treachery & Greed, so perhaps Alessandro Vinta's son Alessio will make an appearance (if I can get the army ready in time!)
~~~~~~~~~~~
Well, after all that, it wasn't really quick at all! Still, a "proper" update (with pics!) will arrive on Sunday
Anyway, life has been a bit hectic since the last update. My grandmother died suddenly, and so there's been a lot going on and the whole family has been a bit out of sorts, naturally.
Napoleonics
As a sort of pick-me-up, my uncle, cousin and myself organised a Napoleonics game during the week to take our minds off things. Austrians vs. French 15mm, with myself commanding the French and my uncle and cousin splitting the Austrians between them (my cousin still hasn't painted his own Russian army...). The game objective was to "Seize the Pass" by controlling a pair of villages along the centre line of the table, each seperated by a stream running the length of the table. It ended up as a losing draw for me; things started off well, as the Austrians bottlenecked on their way to the far village and their cavalry were slowed by marshland on the way to the near village. My light infantry battalion made it to the near village unmolested and held it against all comers (about three strong Austrian infantry battalions and a medium artillery battery) while the Austrian cavalry tried to circle round to my artillery and were held off (and destroyed) by two infantry squares.
The turning point of the battle came when my heavy cavalry charged the loitering Austrian Hussars guarding the far village. I outnumbered the Hussars and had better quality troops. Naturally, I lost the fight and my cavalry retired. The following turn, they charged again (still outnumbering and still better quality) and lost again. As they were already Unsteady, this time they Routed. It was at this point that my three infantry battalions contesting the far village decided to pack up and retire as well; the weight of Austrian numbers was beginning to tell, and the French were gradually pushed back towards the stream.
When we ended the game (due to time), the Austrians held one village and my light infantry held the other. If we'd have carried on, my light infantry would likely have been overwhelmed (although I did have two infantry battalions rushing to support them; the two battalions that had seen off the Austrian cavalry). Still, ending on a draw (even if it would eventually have turned to a defeat) was a fair result.
Other stuff
I managed to complete the entry for Animosity 5's Conversion Contest; photos will follow as soon as the results of the contest are announced.
Da Warpath are currently running a "Crazy Community Unit Project"; the idea is that members sign up to contribute a painted Orc Boy until we've constructed a whole unit! Definitely crazy...
Anyway, I've volunteered to contribute a boy to the project. The bonus is that each member who contributes a painted boy will be entered into a raffle, and the winner wins the whole unit! I'll be starting work on my Boy on Sunday, so will provide (semi-) regular updates of my progress.
In other news, I've started putting together a unit of Giant Rats for my Skaven. The purchase of a sprue of Giant Rats with Packmasters from eBay (all of about £3) in addition to the numerous rats provided on the Doomwheel kit mean I have enough for a unit of 20. Hopefully, they'll be pretty quick to paint - then I suppose I should get started on the mass of Clanrats.
Finally, I'm still plugging away at the Tilean pikemen. Warhammer-Empire.com are planning on running another campaign, set a few years after Treachery & Greed, so perhaps Alessandro Vinta's son Alessio will make an appearance (if I can get the army ready in time!)
~~~~~~~~~~~
Well, after all that, it wasn't really quick at all! Still, a "proper" update (with pics!) will arrive on Sunday
Subscribe to:
Posts (Atom)