Friday, 28 February 2014

Pressies!

I turned another year older about a week ago and, aside from a very nice meal with the other half, the two highlights were hobby-related and very pleasant surprises. 

The first is a Laser Cut MDF Paint Rack from Sphere Products, designed to hold the old style GW hex pots (which make up most of my ageing paint collection). It was a little fiddly to assemble (involving tiny nuts, bolts and washers, with chunky, clumsy fingers and an inability to understand diagrams) but it's a nice size with a large capacity for pots (more than enough for my needs anyway - I thought I had more paints than this!) and that lovely burnt MDF smell as an added bonus! 

With any luck, this will keep my hobby table a bit more permanently organised and prevent me from "spreading" over time as I usually do.


The second, and most unexpected, was a Dual-Action Airbrush and Compressor! A great find by my Dad on eBay, although I can't find any details or instructions for the airbrush itself which is slightly vexing. Even though I'm incredibly excited to have an airbrush and can't wait to get it out and play, I'm also absolutely terrified of breaking it and/or being unable to clean it properly after playing with it, and so it's staying in its box until I've done some proper research into how to go about using it without breaking it, painting the furniture (or a cat) or giving myself asthma, or growing a second head or something. 


So, any advice, tips or tricks from you experienced airbrush users out there would be most welcome!

Tuesday, 25 February 2014

Making a Start...

A bit of a break from the scheduled programming (i.e. Wood Elves...) but an update nonetheless! Somewhat ironically, the first painted figure of 2014 is...a High Elf. Teclis, to be precise, painted for the Asrai.org Miniature Exchange this year. The figure is now safely with it's intended recipient and so it's safe to show pictures.


I also received a model in return, a winter-themed Wood Elf Spellsinger. At least this is one Wood Elf I won't have to paint! 


Many thanks to my painter (Rab) for the model.

Meanwhile, progress on my own Wood Elves is proceeding slowly but surely. I'll update on where I'm at soon.


Friday, 7 February 2014

If You Go Down To The Woods Today...

 On with the show then!

As I stated in my previous post, I've got three main projects I want to focus on this year (or four, if you count the one I don't have to paint figures for!) The first of these are my Wood Elves.

I began repainting my Wood Elves last year in order to take part in GW's Throne of Skulls event in October. I wasn't happy about turning up with my army in the state it was in, as my painting has improved a lot since I first painted them, and so I made the decision to start completely from scratch and repaint everything, starting with the stuff I'd need for a 2000 points list to take to the Throne of Skulls.

The repainted stuff so far - the 2k list I took to the Throne of Skulls
That army consisted of 91 models, which I managed to paint from start to finish in 96 days. Those 2000 points represent less than half of all my Wood Elf models though. I said in the last post that I had 128 more Wood Elves to paint - turns out that number was off by quite a bit, as I'd forgotten to include several of the models I had tucked away in boxes and drawers! For your perusal then, here is the complete list of Wood Elf models I'm aiming to get painted this year:

35 old 5th Edition Archers
39 Eternal Guard
4 Dryads
9 new Glade Guard (archers)
3 Mages
6 Lords/Nobles (four on foot, two mounted)
2 Eagles
15 Glade Riders
15 old 5th Edition Glade Riders
Dragon
16 Wardancers
12 Waywatchers
Treeman
6 Warhawk Riders
Orion
Ariel

Total - 166 models


A selection of Wood Elves waiting to be undercoated

Quite a task! Given that I've painted an average of around 130 models per year over the last three years, if I paint all the Wood Elves it will be a good year, let alone tackling any of my other projects. Nevertheless, I am going to plough ahead and attempt it. I'm busy preparing models for painting for all three projects - if it ever stops raining, I'll even get to go outside and undercoat them, so that painting can commence!

Friday, 24 January 2014

A Breath of Life!

Hello again!

It's certainly been a while, but I'm still alive and kicking, and still intent on boring you with my continuing efforts to make a dent in my lead mountain...

So, somewhere during my mini-hiatus, we moved from the familiar territory of 2013 into the new world of 2014. I had intended to write up the typical "wrapping up" post at the end of December, reviewing what I'd done over the course of the previous twelve months, but that seems somewhat redundant now that we're almost a month into a new year. I'll simply give a brief summary instead; I painted a grand total of 180 figures, 50% of which were made up of my Wood Elf tournament army that I took to GW's Throne of Skulls event in October. I deliberately didn't set myself any tangible goals at the beginning of 2013 but as it turns out 180 is the highest number of painted figures I've completed since I started counting my annual output in 2011. How much that had to do with not setting any goals I don't know, but this year I *am* setting some goals; or rather, I'm going to try and focus my efforts on a select number of projects.

So, for 2014, these are the projects I want to try and tackle. In no particular order:

Project #1 - Wood Elves

Despite painting 2000pts worth of Wood Elves towards the end of last year (91 models in total), I still have a bunch of figures still to receive the new paint job - 128 models, to be precise. With the Wood Elves rumoured to be getting a new army book (finally!) some time around May this year, I'd like to get at least part way to painting all my old stuff before any of the new toys come out. Given that my beloved Wood Elves have waited nearly a decade for any new stuff, you can take it for granted that I will be picking up every new shiny model that gets released for them, just in case it's another nine years before they get updated again. I have already forewarned She Who Must Be Obeyed, and she has graciously allowed me to stockpile some coinage so that I might fund my unhealthy habit without diverting money from More Important Things™

Model Count = 128

Project #2 - Imperial Romans

After a year or so of sitting in boxes in a wardrobe, I decided towards the end of last year that the Romans would be one of the projects I wanted to tackle in 2014. I already had a bunch of Warlord Games plastics and Foundry metals, and I added a few more metals second-hand courtesy of Colonel Bill's at Wargamer in December (although, on reflection, these weren't perhaps the best purchases for a starter army...), so now is the time for the Might of Rome to arise to spread Imperialism among the other denizens of the Man Cave.

I'll also probably pick up more Romans from Colonel Bill's when we head to the WMMS/Alumwell in March. Those purchases won't be approved by The Treasurer, but providing I can sneak them into the house, I might get away with it...

Model Count = 124

Project #3 - Italian Condottieri

If you've read the blog for a while, you'll probably have seen a few posts showing the plastic Perry Miniatures 'European Mercenaries' I put together. I've got a couple of boxes of Mounted Men-at-Arms sitting in the wings as well, and there's plenty of scope for opposition (lots of Medieval/Renaissance armies out there) and future expansion (although nothing planned this year...)

Model Count = 98

Project #4 - The 2015 Game

We ran our "Battle of Kirkburn Bridge" in December; that was the first outing of hopefully many for this game in 2014 - it's our theme game for the year, being as 2014 is the 700th anniversary of the Battle of Bannockburn. However, we've already had discussions about what we might want to run for 2015, and this will form the fourth big project of the year, once we finalise our plans. We have a pretty good idea of what we want to do; we just have to figure out the details, and get down to putting it together in time for Wargamer at the end of the year (which, traditionally, is when we debut our new games!)


So there we have it! Those are the projects I'm going to try and concentrate the majority of my efforts on this year, although of course I won't rule out side projects - I have plenty of things to be getting on with, and the odd "distraction" session here and there will ultimately help keep me interested in the main projects. All told (excluding side projects) these amount to a nice round 350 figures to paint - if I can achieve that, I'll be well chuffed!

The first distraction will most likely be the resumption of my long-suffering "Battle for Khazad-dum" campaign, as after several false starts over the past couple of months, it's finally looking like we might have a date to play the fourth scenario! Touch wood, it will go ahead as planned this time...

In the meantime, I will be drawing up individual posts to detail the plans for each of the projects over the course of the year, so keep your eyes peeled!


Thursday, 5 December 2013

Wargamer '13 - The Battle of Kirkburn Bridge

It's taken me a few days, but I've finally got round to uploading all the pictures from last weekend's Wargamer show in Great Barr, Birmingham. Yet again, it was a sparsely attended affair, which seems strange considering how many hundreds attend the "West Midlands Military Show" each year just a few miles further up the M6. A distance of just some 15 or so miles from each other, and yet a vast gulf in attendance numbers, which is disappointing. 

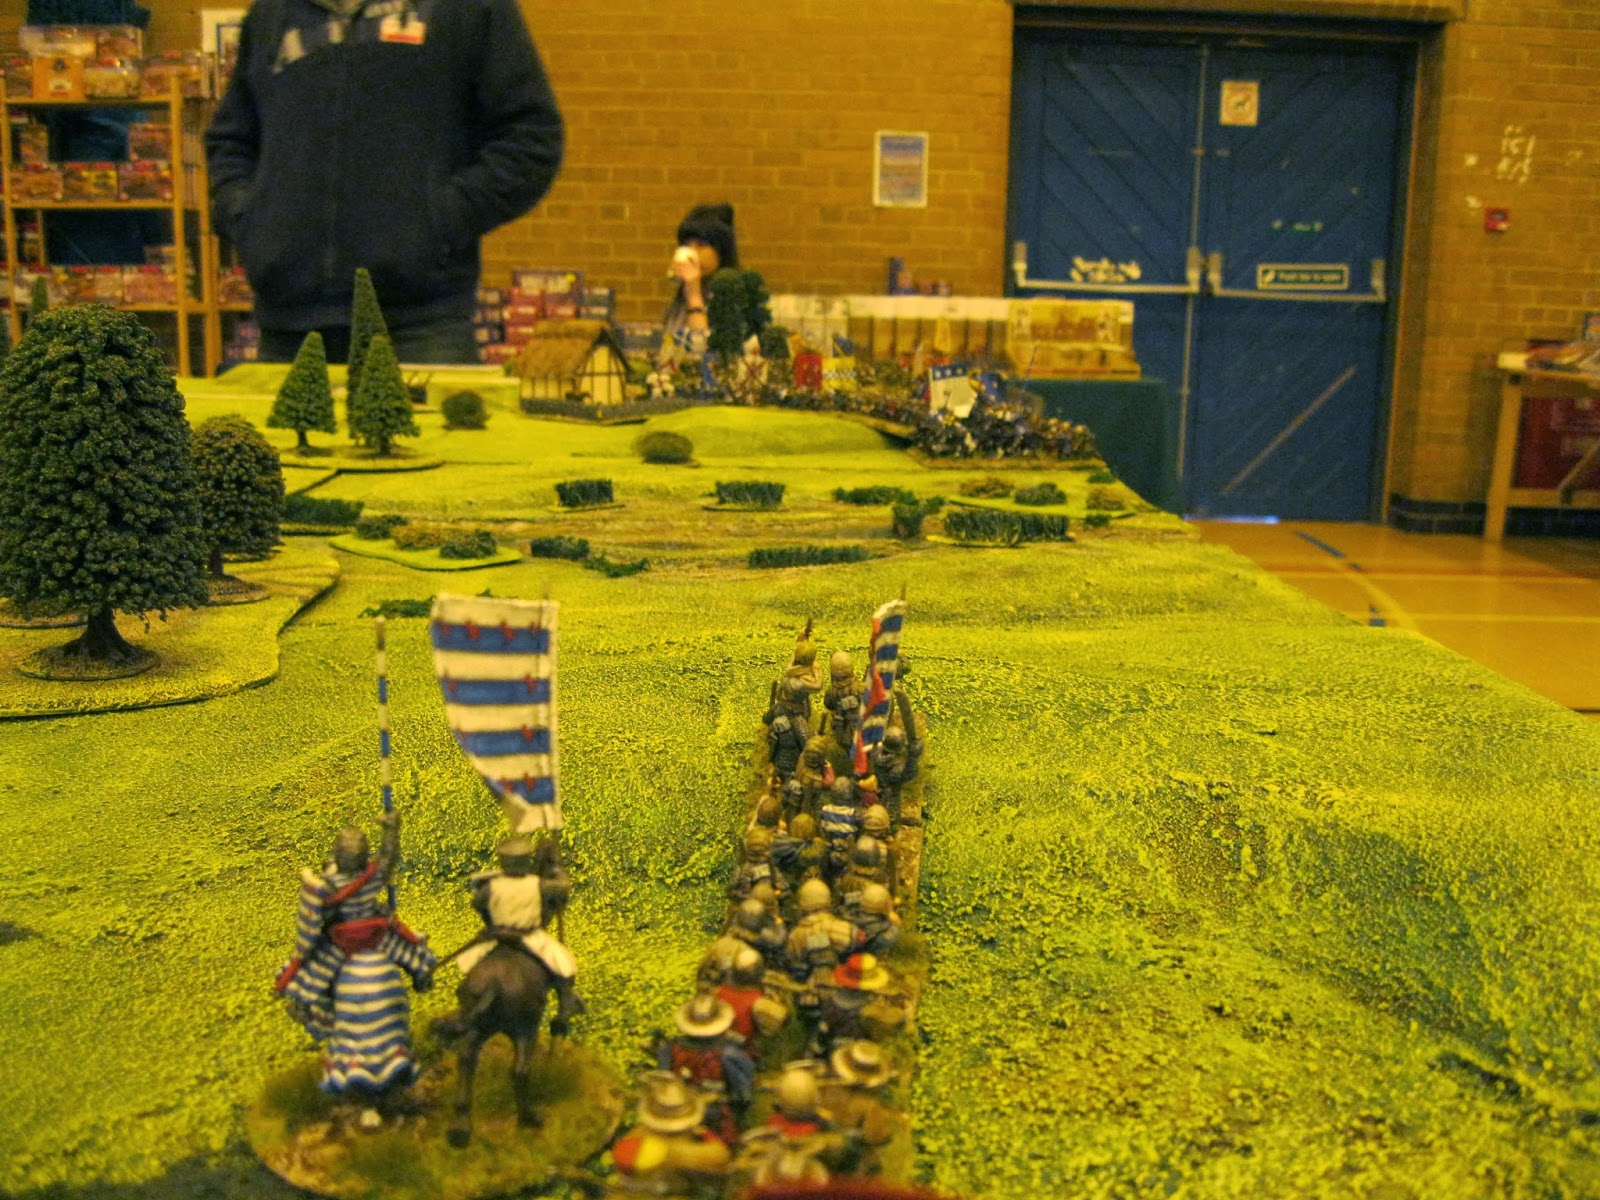
Attendance aside though, it was another successful show for us as we put on our "Battle of Kirkburn Bridge c.1314". Loosely taking elements from the battles of Bannockburn, Falkirk and Stirling Bridge, the scenario pitched the hastily assembled Scots of Robert the Bruce against a two-pronged attack from Edward II's English, who themselves had to struggle across two rivers to close on the Scots. 

The Scots had assembled three divisions under the overall command of Robert the Bruce: Robert's brother Edward commanded one half of the Scottish spearmen, while the Earl of Moray brought his own troops to the foray, and Angus og McDonald roused the Highlanders and Islesmen to their king's cause. 

Edward II's forces were more or less evenly divided between three of his earls: the Earl of Pembroke, Aymar de Valance, commanded English Spearmen and his own archers and knightly retinue; Henry de Bohun, the Earl of Hereford, commanded the same, while Gilbert de Clare, the Earl of Gloucester, was given the bulk of the English knights alongside more spearmen and archers. 

For this first outing, Paul was given command of the Scots whilst Gary took the part of Gilbert de Clare (on account of his Gloucester heritage), leaving me with Hereford, Pembroke and Edward II himself. The rules used were 'Hail Caesar' from Warlord Games. So, without further ado, I'll let the pictures do the talking!

The Scots, not certain of the English positions, ready themselves in a corner

The Scottish right flank - Angus og McDonald's Highland division

View from the Scottish right flank

Robert the Bruce surveys his troops

The English enter the field! Pembroke in the bottom-right, Hereford just in
the picture bottom-left and Gloucester in the very far left corner of the board

Pembroke's view of the Scottish left flank in the distance

Hereford makes his entrance, approaching the aforementioned "Kirkburn Bridge"

Gloucester brings his troops on across the ford

The Scottish advance is slow, too slow to prevent the English crossing both the ford and the bridge

Gloucester's knights manoeuvre around the house to avoid the bottleneck

Gilbert de Clare, the Earl of Gloucester himself

The Highlanders slowly make their way out of their deployment zone!

The view of the battlefield as the battle lines approach

The Scots finally get their act together and make more than a single move in a turn!

A (very yellow) shot of the clash in the centre of the board, as units engage across all fronts.

The combat that would prove decisive - Clifford's retinue (along with a few Welsh Javelinmen)
thoroughly trounce the Islesmen, and create a gaping hole in the Scottish flank...

...which allowed the knights to pounce on the vulnerable archers to the Scottish rear.

The Earl of Moray engages in a complete stand-off with the Earl of Pembroke,
with neither command contributing much to the battle...

...leaving Gloucester and his knights to run rampant in the Scottish rear

The Men of Shropshire see off Edward Bruce and his spearmen

The Highlanders and de Monthermer's knights beat seven bells out of each other,
while the rest of the Scottish line gradually falls apart.

The Highlanders finally succumb to the knightly efforts of de Monthermer's retinue, just as Robert the Bruce succeeds in forcing his way through the English line. Too little too late for the Scots though

Meanwhile, Pembroke and Moray's command continue to stare at each other
across the marsh, until Hereford's knights come across to stir things up

It was at this point, with two out of three Scottish brigades utterly trounced and the third completely outnumbered and surrounded, that the English declared victory and the remaining Scots fled with their tails firmly between their legs. It had taken us just a little less than three hours to play to this point, despite regularly stopping to chat to the many people (relatively speaking, given the general dearth of attendees) who expressed an interest in what we were doing and were really impressed with how we were doing it, and so we decided to have a quick break to browse the show and then reset, this time switching commands so that Gary was in charge of the Scots and Paul ended up with Gloucester's command.


The Scots deploy again, and already the game is shaming up to be
a very different affair - a solid wall of spearmen presents itself!

A close up of the Men of Shropshire regiment, with Henry de Bohun in the background.

The Scots advance in unison, still presenting a solid wall of spears on all fronts.

The English repeat their speedy early advance of the first game,
with Pembroke's command determined to make it across the marsh this time!

Once again the battle lines approach, but in the distance events have unfolded much quicker than before...

Unfortunately, up until this point, I have no pictures to detail what had occurred with Paul's command attempting to cross the ford. Whereas in the first game Gloucester's knights had been the ones to break through the Scottish line, the second game saw it all go wrong for Paul again. Preferring to continue advancing in the face of the enemy rather than deploy and take the inevitable charge, Paul's infantry was caught in column soon after crossing the ford and was hurled back against the banks of the river in short order. This left one unit of knights stuck in column in the ford itself and the other stuck in column impotently on the other side of the river. Driven on by their uncontrollable nature (represented by the "Frenzied Charge" rule), the knights were forced onto the Scottish spears and quickly destroyed.

The situation on the Scottish right quickly reaches it's conclusion; in a desperate attempt to break out, Paul throws his last knights and Welsh Javelinmen against Lennox's spearmen blocking the ford. Inevitably, they're thrown back and destroyed in short order. 

Leaving Hereford to face the bulk of the Scottish army, whilst Pembroke
struggles across the marsh in the face of Moray's forces.

Slowly but surely Pembroke makes his way across the marsh and confronts the Scots. 

Edward II leads from the rear!

The Royal Spearmen, backed by the Earl himself, force their way slowly
through the Scots spears, but lose their archers to Moray's knights in return.
It was at this point that we called the game. Pembroke's command was struggling across the marsh, making headway but not quickly enough to assist Hereford. With two untouched divisions of Scottish infantry bearing down on him, the Earl of Hereford was in a pickle and no mistake. While we hadn't played the game to it's conclusion, the utter failure of Gloucester's command had left the other English brigades in an untenable position, and so we awarded victory to the Scots. 

All told, two very quick, bloody and decisive games played, innumerable positive comments and a lot of interest from passersby. We were a bit disappointed not to come away with the award for Best Display Game, especially given the other games on offer (which we were not at all impressed with, by and large). It might seem arrogant to go around "knowing" your game is the best on show, but in this case I truly believe that it was. Wargamer uses a vote to decide the best game, with each group of gamers given a vote. The downside of this system is that it requires people from each display game to actually go around and *look* at the other games on offer, which very few people did. I know for certain that the people who actually came and looked at our game also voted for it, because they all said as much! A vote may be the "fairest" way of deciding the best game at a show, but it also requires the gamers to be active participants in the voting which sadly isn't the case, as many of the gamers at Wargamer are not interested in looking around the show itself...

Anyway, now I've got that bugbear out of the way, I'll get back to the good stuff. I didn't take many pennies with me to the show, on account of the fact that Christmas is coming and I'm also trying to curb my spending when it comes to figures, but I did take the opportunity to pick up some Early Imperial Romans from Colonel Bill's - enough for a unit each of Auxiliary Archers and Auxiliary Cavalry. These will go along nicely with the plastic Roman legionaries I have from Warlord Games (which have been sitting in a box since last year) and a bunch of Foundry Roman Legionaries that I got cheap from Stafford Games a couple of weeks ago. These will form the basis for the first big project of 2014, which I'll go into in a future post!

Saturday, 30 November 2013

Happy St. Andrew's Day!

I'm sure time speeds up the closer we get to the end of the year. It certainly doesn't feel like a month has gone by since my last blog post, but there you go! Apologies for the big absence - a combination of holidays, work and preparations for Christmas have left me little time for blogging or, indeed, the hobby itself. I'm looking to get a few bits and bobs finished off before the end of the year, so hopefully I'll still manage to fit a couple more posts in before 2013 comes to a close. 

But back to this post. It's St. Andrew's day, the national day of Scotland. Now, I'm not Scottish and so have no real reason to celebrate but, as luck would have it, it's rather appropriate for the topic of this post. 

As regular readers (if there are any...) might know, every so often myself and G of G's Spot fame get involved with wargames shows and take on the challenge of putting on demo games. You can read about a few of our past efforts here.

So how does this relate to St. Andrew's Day or Scotland?

Well, it just so happens that our latest offering is a Bannockburn-era "Wars of Scottish Independence" game, prepared for the 700th anniversary of the battle of Bannockburn next year (24th June 2014). It also just so happens that tomorrow will see the first outing for said game, at the relatively-local Wargamer show in Great Barr, Birmingham. It's perhaps fortuitous for the English player (i.e. me) that we're playing the day after St. Andrew's Day, rather than on the patron saint's day itself! Not that it will help my dice rolling any, of course!

So, if anyone's in the vicinity of Great Barr tomorrow, pop in to Wargamer and say hello!

Wednesday, 23 October 2013

Throne of Skulls - Day 2

So after the hammering I'd received on Day 1, plus staying up late to join in with the Bugman's Bar Pub Quiz, I'd developed a massive headache on the drive home from Nottingham. Day 2 nearly didn't happen, as I missed my alarm and just about managed to get to Warhammer World for 9.15am on Sunday morning (with Game 4 starting at 9.30!) Would fortune deal me a different hand today?

Day 2

Game 4: Watchtower
Jim Cockburn - Khorne Warriors

Well, apparently not. Watchtower (the least favourable scenario for Wood Elves) against Khornate Warriors (probably the best troops to occupy a Watchtower!) Jim himself took one look at the table and my army, and instantly apologised for what was to come. I had no units that I could comfortably put in the Watchtower (except squishy archers, or minimum-sized Dryad units), and if Jim got his Warriors in the tower then I had nothing that would be able to get them to budge...

Jim's army was:
  • Angry-Ron, Khorne Lord on Juggernaut
  • Exalted BSB (with Warriors)
  • 15 Warriors of Khorne, additional hand weapons
  • 24 Marauders of Khorne
  • 5 Marauder Horsemen of Khorne
  • Warshrine
  • Slaughterbrute
  • Gorebeast Chariot
  • Hellcannnon
Jim's Khorne Lord, Angry-Ron
We began by rolling for who gained control of the watchtower, and I found myself winning the roll. If I placed a unit in the tower, I'd have found myself on the receiving end of a first turn charge from Jim's warriors. If I didn't place a unit in the tower, I'd give Jim an open road to move his warriors into the tower unopposed, and I'd never be able to get them out. A tough choice, but I decided to forgo the opportunity to deploy in the tower and instead deployed everything in my deployment zone. Jim responded by deploying his army in bulk, with the Warriors directing opposite the watchtower so that they could race inside as quickly as possible.


Jim received the first turn, and immediately the Warriors marched up to the walls of the watchtower in the certainty that they'd be able to enter before I could do anything about it. The Marauder Horsemen marched right into the face of the Eternal Guard, in between the wood and the corner of the watchtower. 


Jim's shooting consisted of just five throwing axes from the Horsemen into the Eternal Guard, and the Hellcannon landing a shot bang on top of them as well, combining to remove a rank. Magic saw the Warshrine bless the BSB and two unit champions with various bonuses...

My turn saw the Eternal Guard charge the Horsemen and slice through them, although they didn't overrun. The Dryads moved into the wood while the Treekin marched up as far as they could to the watchtower, with the Eagle moving ahead to block Angry-Ron. The Glade Guard advanced to get clear lines of sight. Magic achieved nothing, while shooting started taking the Marauders down and attempted to damage the Gorebeast chariot without success.

Turn Two, and Jim moved his Warriors into the tower as expected. The Gorebeast charged the Eagle, who fled and allowed Angry-Ron to then charge into the Treekin. The Slaughterbrute attempted to charge the Eternal Guard but failed to achieve the distance (the Marauders would have charged as well, but Jim couldn't fit both units in combat around the watchtower and so chose just to charge with the Slaughterbrute). The Hellcannon failed it's control test and was forced to attempt a charge against the nearest Eagle, although it failed to reach it by an inch. The slaughter unleashed by the Khorne Lord more than made up for the failed charges though, as he cut through four Treekin in one go. Unsurprisingly they broke and fled, although Angry-Ron could only catch the already-fleeing Eagle rather than the Treekin themselves. 

In response, the EG charged the Marauders while both Dryad units charged the Slaughterbrute (one in the front, one in the flank). The Spellweaver and Scouts moved up behind the EG, as it was the only place to avoid Angry-Ron's charge arc! The Treekin managed to rally right in front of Angry-Ron, while the small Glade Guard shuffled over to get a shot at the Khorne Lord. The Weaver attempted to skewer Angry-Ron with an Amber Spear, but was denied by his ward save. The big Glade Guard managed to take a wound from the Gorebeast Chariot but it kept on rolling inexorably towards them. The Eternal Guard broke the Marauders easily, but chose not to pursue and instead to reform to face the tower as I had to do something about those Warriors sitting inside! Unfortunately, despite inflicting two wounds on the Slaugherbrute, the Dryads were slaughtered in return and only four of the flanking unit were left to flee from the combat as the Slaughterbrute ran the other unit down. 

T3, and the Slaugherbrute carried on charging forward into the nearby small Glade Guard unit, despite losing another wound to the Stand & Shoot. The Gorebeast finally managed to reach the big Glade Guard unit, who took another wound with their S&S. The Warshine continued to bless the BSB and Warriors champion with bonuses, while the Marauders managed to rally. Rather than charge the Treekin,  Angry-Ron instead chose to march around to get into position to charge the Weaver and her bodyguard. Unsurprisingly, the Gorebeast Chariot broke the big Glade Guard unit but in a real turn up for the books, the small Glade Guard unit managed to kill the Slaughterbrute before it could attack! 

My turn again, and the Eternal Guard mustered the courage to charge into the watchtower and attempt to take on the Warriors. The Dryads failed to rally and came within an inch of fleeing the table, although the big Glade Guard decided they'd had enough and fled the field. The Scouts and small Glade Guard did what they could to avoid Angry-Ron's charge arc again, although the Glade Guard couldn't totally avoid it. The Weaver again tries to Amber Spear Angry-Ron to death, this time getting past his ward but only managing to roll one wound! To make matters worse, the Eternal Guard are completely wiped out by the Chaos Warriors (although my BSB managed to hit, wound and kill with all three of his attacks - most definitely the most he's ever achieved, because he's never rolled more than one hit before ever!)

Jim's turn and Angry-Ron forces the small Glade Guard to finally quit the field while the Gorebeast attempted to rejoin the action. The Hellcannon fired a perfect shot right on top of the Spellweaver's unit, killing all the Scouts but somehow failing to kill the Spellweaver, reducing her to just one wound. 

Clearly, this really annoyed the Weaver - to take her revenge, she finally managed to throw a killer Amber Spear through Angry-Ron's black heart and taking him out (although the Treekin had attempted to charge him instead, just as a precaution). The last Glade Guard continued to reduce the Marauders, while the Dryads manage to rally on the table edge. Back over to Jim and the Gorebeast ploughed into the rear of the Treekin while the Warriors sat comfortably in their watchtower. Naturally, the Gorebeast destroyed the Treekin, leaving my Spellweaver with a perfect shot for her Amber Spear. She duly obliged in my own turn, as did the Glade Guard who finished off the Marauders. 

The game ended up running all the way through to Turn 10 and right up to the time limit. By this point, we'd drawn quite a crowd of spectators (including the GW Event team!) who'd come to watch what had turned into an epic battle! By the time the game finally ended (obviously with Jim in control of the watchtower) I had a small unit of Glade Guard, half a unit of Dryads, and Eagle and a Spellweaver with one wound, while Jim had his Hellcannon, Warshrine, BSB and 12 Warriors left. 

Result: Loss

So another Loss, and with only one game left this was my last chance to recover some pride. I ended up facing off against Graeme Clarke and his Dark Elves - just like me, Graeme had lost his first four games as well...


Game 5: Dawn Attack
Graeme Clarke - Dark Elves

Graeme had resisted the urge to take many of the new Dark Elf toys in his list, and instead he had gone with something more "traditional", although he also fielded the first Special Character I'd seen over the weekend:


  • Morathi (with Corsairs)
  • Lv.2 Sorceress (with Corsairs)
  • BSB Master (with Corsairs)
  • 10 Repeater Crossbows with Musician and Banner
  • 10 Repeater Crossbows with Musician and Banner
  • 40? Corsairs with Musician and Banner
  • War Hydra
  • War Hydra
  • Reaper Bolt Thrower
  • Reaper Bolt Thrower
  • Bloodwrack Medusa
  • 5 Shades with Great Weapons
The deployment rolls were fairly kind to both of us: I ended up winning the roll off and deploying first, and ended up with a single unit of Dryads on the right flank, a unit of Dryads, the Treekin and Scouts with Weaver on the left, and everything else in the centre. I stacked everything towards the left flank, deploying the big GG and one small GG on the right of centre, the EG and second small GG on the left of centre, with the TK next to those GG and the Dryads on the left of the TK. One Eagle hid behind the EG, the other deployed behind the big GG.

Graeme ended up with a Bolt Thrower on his left, one unit of Crossbows on his right and everything else in the centre. He decided to stack both Hydras, both Bolt Throwers and the Medusa on his left flank (turns out he was terrified of what my shooting and Amber Spear could do to his Hydras, which I was quite surprised by)


I managed to win the roll off and chose to go first, to take advantage of my greater shooting range (30" for Wood Elves, compared to just 24" for his Crossbows). The Dryads on both flanks marched straight forward as far as they could, with both Eagles doing the same to hide behind both woods in an effort to avoid the worst of Graeme's shooting. The Treekin marched to threaten the Corsairs, with the Eternal Guard moving up to the watchtower to threaten the Shades or Corsairs as the situation dictated. Magic saw the Shades fall foul to Curse of Anraheir, which would severely hamper their shooting and would force them to take Dangerous Terrain tests if they moved anywhere. Shooting saw the right hand Glade Guard units begin the punishment of the Crossbows on my right - even at extreme long range, they managed to kill half the unit but the Druchii passed their Panic test. The Glade Guard on the left began the long process of whittling down the Corsairs, but could only manage a single casualty. 

Graeme's turn began rather more cautiously than I was expecting. He chose to move the Shades away from the Eternal Guard and out of the watchtower, but suffered three casualties as a result of Curse of Anraheir. The Hydras edged forwards between the two Bolt Throwers, being careful not to obscure their line of sight, while the Medusa moved around alongside the Crossbows to get a clear shot at the Eagle lurking behind the wood. The Corsairs, accompanied by the BSB and Morathi, inched forwards very slightly to avoid moving through the wood and to leave only long charges if the Treekin and Eternal Guard wanted to make it into combat, while the Sorceress decided she didn't like their company and left the unit. The right-hand Crossbows moved as far as they could to get into range of the Glade Guard, while the left-hand Crossbows were already in range of the Dryads but failed to inflict any damage when the time came. Graeme's magic had the potential to be very dangerous, and I chose to use my Dispel Scroll straight away when he tried to use Spirit Leech on my BSB. The Corsairs took a couple of wounds from the Eagle but not enough to kill it, the Shades achieved nothing thanks to Curse of Anraheir again, the Medusa managed to pluck the Eagle from the sky, while the combined fire of two Bolt Throwers and the Crossbows on the right could only kill three of the small Glade Guard unit, who passed their Panic test with ease. 

My Turn 2 saw an early charge attempt from the Eternal Guard and Treekin into the Corsairs only half succeed, as the Eternal Guard made the distance but the Treekin fell short. This wasn't what I had hoped for! Elsewhere, the Dryads on the right began to toy with the Hydras, moving up on the right-hand side of the wood, out of charge arc. The Dryads on the left employed a similar ploy with the Crossbows, entering the wood and forcing the Crossbows to move if they wanted a clear shot before the impending charge. The remaining Eagle flew over the Dark Elf line in order to threaten the flank of the first Bolt Thrower, forcing Graeme to deal with it somehow. The Glade Guard continued their shooting, with the Crossbows on the right removed completely. The two remaining Shades survived the few shots that managed to hit them. The combat between the Corsairs and the Eternal Guard ended up completely level, despite Morathi killing the Eternal Guard champion in a challenge. 

Graeme's second turn saw the remaining Crossbows fail their swift reform to face the Dryads, preventing them from shooting at the forest spirits coming their way. The Medusa had to do something about the remaining Eagle and so moved across to get another clear shot, removing the last wound from the birdie. The Hydras continued to dance with the Dryads, both of them moving to line up a charge, while the two remaining Shades hit the flank of the Eternal Guard with their great weapons. Morathi again tried to Spirit Leech my BSB, but I managed to dispel this, so instead she cast Doom & Darkness , reducing their Ld by 3, and Word of Pain on them. Graeme's shooting again fell short of expectations with the two Bolt Throwers only managing to kill two more Glade Guard, who again passed their Panic test. The combat saw things swing in Graeme's favour, however, as Morathi succeeded in cutting down my BSB in another challenge and the Corsairs took bloody chunks out of the Eternal Guard. The Guard lost the combat with just two of their number alive, were no longer Stubborn and were taking a Break test on basic Ld6 thanks to Doom & Darkness. They needed Insane Courage and unsurprisingly failed to roll the necessary double 1s. Graeme pursued with the Shades and ran the unit down, while the Corsairs restrained themselves to face the oncoming Treekin.

Turn 3, and the Treekin attempted to make amends for their earlier failed charge by smashing in to the Corsairs, while the left-hand Dryads did the same against the Crossbows (who did no damage with their S&S). On the right, the Dryads couldn't totally avoid the Hydras' charge arc, but more importantly managed to make it into the nearby wood and thus become Stubborn against whatever was coming their way. The Glade Guard continued to advance on Graeme's remaining units, with the right-hand units attempting to take out one or both of the Bolt Throwers but failing. The left-hand Glade Guard tried to take out the onrushing Shades, but could only kill one of them. Both combats went my way, as the Dryads reduced the Crossbows by half and the Treekin took out plenty of Corsairs for only two wounds in return, but both units passed their Steadfast Break tests and held. 

Graeme's turn again and one of the Hydras finally managed to catch the elusive Dryads, although the other Hydra was unable to assist it's kin so instead repositioned to help out in the next turn. The Medusa slithered across behind the Corsairs in an attempt to assist the Crossbows out on the left. Magic saw Morathi attempt to use Spirit Leech on my Spellweaver, but the Hag Sorceress lost the roll-off. The Bolt Throwers had another abysmal round of shooting, reducing the small Glade Guard unit on the right down to three. Things went from bad to worse for Graeme as the Dryads on the left killed the remaining Crossbows in short order and reformed to face the Medusa, and the Treekin inflicted another devastating round of casualties on the Corsairs who this time broke and fled, taking the BSB and Morathi with them. The unit fled 8", Morathi fled 9", the Treekin pursued 10" and caught them both. That just summed Graeme's day up. The one upside for Graeme was that the Hydra managed to toast four of the Dryads it was facing for no wounds in return, but the Forest Spirits passed their Break test and held. 

In to Turn 4, and it was effectively all over. The Dryads charged the Medusa, the Glade Guard finished off the last Shade and shot down the lone Sorceress, while the Treekin stood still in an attempt to avoid adding to Graeme's suffering. The Dryads fighting the Medusa easily beat it and ran the creature down, while the Dryads on the right managed to hold on against the Hydra with just a single model remaining. Graeme's Turn 4 saw the other Hydra join the combat and finally kill the last Dryad, overrunning through the forest to threaten the Glade Guard who had survived for so long. The Bolt Throwers then finally succeeded in killing the unit of Glade Guard they'd been shooting at for four turns. 

Turn 5 saw salt well and truly rubbed into Graeme's wounds, as the untouched big Glade Guard unit simply swift reformed and sent arrow after arrow plunging into the approaching Hydra, sending it crashing to the ground in an astounding display of failed armour saves. With only one Hydra and two Bolt Throwers remaining, Graeme's turn was short and sweet. The last Hydra marched up to the big Glade Guard unit and spat fire all over them, killing half their number in one go and forcing them to flee towards the table edge. The Bolt Throwers again fluffed their shots and failed to inflict further damage on the fleeing Glade Guard. 

We had 15 minutes left at this point, and Graeme insisted we play to the end and let the game run it's course. The Glade Guard rallied, the Hydra survived the incoming spells and arrows, and then failed it's final charge before the Bolt Throwers had the last act of the battle as they took a final two casualties from the big Glade Guard unit, who this time held their ground and remained on the field. 

Graeme had his Hydra and two Bolt Throwers remaining. I had a unit of Dryads, the Treekin, my Scouts and Spellweaver, a small unit of Glade Guard and five members of the big Glade Guard unit still on the table. 

Result: Win!

So, come the final game of the weekend, I had recovered some pride and wouldn't go away with a 100% losing record. I felt incredibly sorry for Graeme after the game (well, from about Turn 2 onwards actually...) - you could tell by the end that he was getting fed up of things not going his way at all, but he remained a great sport and tried to keep his head up throughout. It would have been a much closer call if his dice had not been so tragically bad (four turns to kill ten unarmoured archers?!?!), but I can't deny the relief I felt when I saw his army across the table before deployment and I knew I had a good chance of at least a Draw. 

Graeme was one of only four Dark Elf players at the event, despite them having the very latest army book - I thought they'd be all the rage but that honour, perhaps unsurprisingly, went to the Warriors of Chaos with 19 representatives. Ironically enough though, it was a Dark Elves army that won the event!

As for me, I'd rescued my pride in the very last game and achieved my objectives of not losing every game and not coming absolute last. In the end, I only gained 6 points from a possible 20 but this was enough to ensure I came 71st out of 98 - not absolute last! I was also given the "Defender of Athel Loren" award for Best Wood Elves Player! (we'll quietly gloss over the fact that I was also the only Wood Elves player!!)