Just to confirm that I am still alive and kicking. Production has ceased in HobbyLand over the past fortnight as a combination of real-life priorities, events and general procrastination have kicked in for the summer. It's about time I got my backside into gear though - the Asrai.org Miniature Exchange is now past the halfway point, and I have to finish my figure before August 21st. The Dystopian Wars fleet is sitting half-undercoated and has been for quite some time; I washed them three or four times before painting, and they still seem to have oily residue all over them which makes them incredibly frustating to try and get paint to stick. In the end, I put them down and gave up. Maybe a couple of weeks of neglect has made them more cooperative?
Anyway, I ended up in HobbyCraft today (probably my favourite shop in the world, just for all the random bits and bobs you can find!) and decided that it would be a good idea to buy a nice big box to fill with yet more wargames stuff. It's a 10 litre clear box about 3.5" deep, and it will hopefully be ideal to put all my Skaven in (rather than having them in about half a dozen various cardboard boxes under the bed). Once I got it home, I set about sticking a load of steel paper to the bottom and now it's all ready to hold my little ratmen. I'm a bit dubious whether the Rat Ogres will quite manage to squeeze in, and the Doomwheel definitely won't, but unfortunately the next size of box was about 6" deep and I'd have ended up with most of that as wasted space. Still, it will be perfect for pretty much everything else. Now I just need to start magnetising the figures...
Sunday, 31 July 2011


Thursday, 14 July 2011
'Counter Attack at the Bridgehead'
After much delay, I can finally post the next Napoleonic battle report!
The fourth game in our Napoleonic mini-campaign was played before I went off on holiday (just about three weeks ago now...), and for the first time in the campaign I was the aggressor! So far I've been on the back foot, facing whatever the Austrians could throw at me with whatever minimal and hastily-gathered forces I had available, but this was my chance to take the fight to the enemy!
The scenario this time took the action back to the small and (previously) peaceful village of Fleur. You may remember the first game where the Austrians were aiming to force a bridgehead against the French garrison. Well this time, it's the French who are trying to force the bridgehead but rather than trying to prevent the Austrians getting in, I was now trying to stop them leaving!
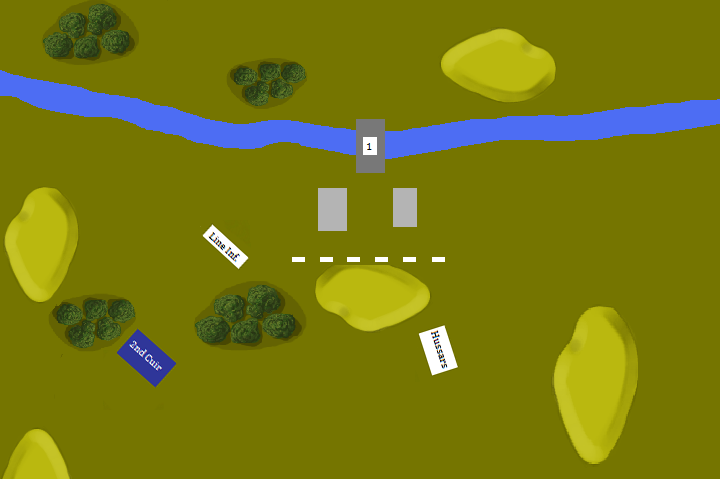
The board was set out much like the first game (as you'd expect - good job we took photos or we'd never have remembered what it looked like!), except this time with more of the "French" side on show to allow for manoeuvres.

The French forces were made up of fresh troops, marched urgently from the northern training camps upon hearing the news of the Austrian invasion. Commanded by General de Lude, they consisted of a squadron of Cuirassiers, three Line Battalions and two medium artillery pieces.
The Austrians, meanwhile, had only what had been left behind after the first battle at Fleur as a rearguard. This gave them a squadron of Hussars, a Line Battalion, a Grenzer/Jager battalion and a single artillery piece. Alas, my inability to cause casualties in the first game came back to haunt me as the forces were more or less even. To make matters worse, there was the pervading threat of the main Austrian army arriving at some point on their way back from St Michel. Needless to say, time was of the essence for the French. The bridgehead had to be secured before nightfall, and before the main Austrian force arrived to sweep my meagre resistance aside once again.

Deployment was commenced with the Austrians having to set up all forces and assign orders before the French entered the field. I had the advantage of seeing the Austrian deployment, but was restricted to deploying in the valley between the two hills. At the start of the game, only my advance unit of cavalry was available - the footsloggers and guns would show up on Turn 3. The Austrians, clearly unaware of where the French would approach, set up in a general perimeter around the village with the cannon guarding the bridge (despite twice informing my opponent that the cannon could not see over the buildings - leaving it with a very limited arc of fire!)

Turns 1 and 2 began in unspectacular fashion - general advances with the Austrian light infantry maintaining their central position while the Hussars and Line Battalion advances towards the Cuirassiers.

Turn 3 got things off with a bang; the three French Line Battalions showed up in the valley, along with the artillery, and the Cuirassiers made the first charge of the game against the Austrian Line who elected to stand and shoot rather than attempt to form square. With some very jammy dice rolling, it paid off and the Cuirassiers were forced to retreat in ignominy.

Turns 4 and 5 saw the situation quickly restored, with the Cuirassiers once more launching themselves at the Austrian Line, this time with the direct support of General de Lude himself! His inspiring presence must have done the trick, and the Austrian Line pushed their luck too far by electing again not to form square and they paid for it. The Cuirassiers pursued them right up to the river, just failing to catch them (by 1/2"!). This left them in a bit of a predicament with the Austrian cannon now staring them straight in the face.
Meanwhile, the Hussars began their harassment of the lone Line Battalion, forcing them in to square and halting the advance. The other two Battalions continued their march forward towards the village, with the Austrian Grenzer reformed to plug the gap left by their fleeing compatriots.

Turns 6 and 7 saw the inevitable bombardment of the Cuirassiers, who duly fled only to once again benefit from General de Lude's direct involvement to rally them. Unfortunately, the Austrian Line infantry also managed to rally with the assistance of the Austrian General. Meanwhile, the Hussars continued to frustrate the French infantry battalion, so much so that a second battalion was diverted away from the village to deal with them.

Turn 8 saw much manoeuvring (accompanied by many a confused look on the umpire's face, as he wondered what the hell I was doing!) All I can say is that I knew what I was doing, and it sort of worked. While the 6th Line marched between the woods to see off the Hussars, the Cuirassiers marched across the front of the 5th Line Battalion to take up the vacated position previously occupied by the 6th and line up ready to launch a charge into the Grenzer. Meanwhile, the French artillery finally took up firing positions alongside the 5th Line, and opened fire on the Austrian Line.
Turn 9, and the Cuirassiers launched their charge against the Grenzer who also elected to stand and shoot rather than form square. Once again, it didn't work and the Cuirassiers struck home with predictable results. Even better, the Grenzer fled straight back across the bridge and prevented the cannon from firing! The Austrian position was looking tenuous, and there were anxious glances at the umpire and questions. Where was the rest of the Austrian army?!

Unfortunately, the tables quickly turned. Success against the Grenzer left the Cuirassiers open to a counter charge by the Hussars, and with the casualties sustained thus far the Cuirassiers were unable to stand up to the Austrians. Likewise, the 5th Line also succumbed to the firepower of the Austrian infantry and artillery and fled the field.

The Hussars then took up position in the village, ready to face off against the two remaining French infantry battalions, who advanced onto the hill each forming square alternately. Meanwhile, the Austrian infantry marched against the French artillery, taking casualties along the way.

Turn 14, and in an attempt to force the situation, the Hussars charged the infantry squares. Taking fire as they came in, they luckily managed to break the square but were unable to catch them. Meanwhile, the combined fire of the cannon and Line infantry put paid to one of the French artillery pieces.

Turn 15, and the French artillery had inflicted enough casualties to break the Austrian infantry, who fled towards the bridge. The Hussars charged the infantry square again and this time they were beaten and broken for good, leaving a single cannon defending Fleur. Victory was within my grasp, and the Austrian army was nowhere in sight!
Alas, it was not to be. Turn 15 proved to be the last of the game, and night fell just as the French were within reach of the village and the bridge. It also turned out that the Austrian army never did arrive - my opponent had convinced himself that help was on it's way, and this proved not to be the case.
All in all, things are set up very nicely for a climactic finish! Can Frankreich salvage her honour (and oodles of stolen cash) by defeating the Whitecoats before they can make it back across the border? Can Osterreich stop eating sausages long enough to get away with their ill-gotten loot?
The final, thrilling encounter will determine all!!!
The fourth game in our Napoleonic mini-campaign was played before I went off on holiday (just about three weeks ago now...), and for the first time in the campaign I was the aggressor! So far I've been on the back foot, facing whatever the Austrians could throw at me with whatever minimal and hastily-gathered forces I had available, but this was my chance to take the fight to the enemy!
The scenario this time took the action back to the small and (previously) peaceful village of Fleur. You may remember the first game where the Austrians were aiming to force a bridgehead against the French garrison. Well this time, it's the French who are trying to force the bridgehead but rather than trying to prevent the Austrians getting in, I was now trying to stop them leaving!
The board was set out much like the first game (as you'd expect - good job we took photos or we'd never have remembered what it looked like!), except this time with more of the "French" side on show to allow for manoeuvres.

The French forces were made up of fresh troops, marched urgently from the northern training camps upon hearing the news of the Austrian invasion. Commanded by General de Lude, they consisted of a squadron of Cuirassiers, three Line Battalions and two medium artillery pieces.
The Austrians, meanwhile, had only what had been left behind after the first battle at Fleur as a rearguard. This gave them a squadron of Hussars, a Line Battalion, a Grenzer/Jager battalion and a single artillery piece. Alas, my inability to cause casualties in the first game came back to haunt me as the forces were more or less even. To make matters worse, there was the pervading threat of the main Austrian army arriving at some point on their way back from St Michel. Needless to say, time was of the essence for the French. The bridgehead had to be secured before nightfall, and before the main Austrian force arrived to sweep my meagre resistance aside once again.

Deployment was commenced with the Austrians having to set up all forces and assign orders before the French entered the field. I had the advantage of seeing the Austrian deployment, but was restricted to deploying in the valley between the two hills. At the start of the game, only my advance unit of cavalry was available - the footsloggers and guns would show up on Turn 3. The Austrians, clearly unaware of where the French would approach, set up in a general perimeter around the village with the cannon guarding the bridge (despite twice informing my opponent that the cannon could not see over the buildings - leaving it with a very limited arc of fire!)
Turns 1 and 2 began in unspectacular fashion - general advances with the Austrian light infantry maintaining their central position while the Hussars and Line Battalion advances towards the Cuirassiers.

Turn 3 got things off with a bang; the three French Line Battalions showed up in the valley, along with the artillery, and the Cuirassiers made the first charge of the game against the Austrian Line who elected to stand and shoot rather than attempt to form square. With some very jammy dice rolling, it paid off and the Cuirassiers were forced to retreat in ignominy.

Turns 4 and 5 saw the situation quickly restored, with the Cuirassiers once more launching themselves at the Austrian Line, this time with the direct support of General de Lude himself! His inspiring presence must have done the trick, and the Austrian Line pushed their luck too far by electing again not to form square and they paid for it. The Cuirassiers pursued them right up to the river, just failing to catch them (by 1/2"!). This left them in a bit of a predicament with the Austrian cannon now staring them straight in the face.
Meanwhile, the Hussars began their harassment of the lone Line Battalion, forcing them in to square and halting the advance. The other two Battalions continued their march forward towards the village, with the Austrian Grenzer reformed to plug the gap left by their fleeing compatriots.

Turns 6 and 7 saw the inevitable bombardment of the Cuirassiers, who duly fled only to once again benefit from General de Lude's direct involvement to rally them. Unfortunately, the Austrian Line infantry also managed to rally with the assistance of the Austrian General. Meanwhile, the Hussars continued to frustrate the French infantry battalion, so much so that a second battalion was diverted away from the village to deal with them.

Turn 8 saw much manoeuvring (accompanied by many a confused look on the umpire's face, as he wondered what the hell I was doing!) All I can say is that I knew what I was doing, and it sort of worked. While the 6th Line marched between the woods to see off the Hussars, the Cuirassiers marched across the front of the 5th Line Battalion to take up the vacated position previously occupied by the 6th and line up ready to launch a charge into the Grenzer. Meanwhile, the French artillery finally took up firing positions alongside the 5th Line, and opened fire on the Austrian Line.
Turn 9, and the Cuirassiers launched their charge against the Grenzer who also elected to stand and shoot rather than form square. Once again, it didn't work and the Cuirassiers struck home with predictable results. Even better, the Grenzer fled straight back across the bridge and prevented the cannon from firing! The Austrian position was looking tenuous, and there were anxious glances at the umpire and questions. Where was the rest of the Austrian army?!

Unfortunately, the tables quickly turned. Success against the Grenzer left the Cuirassiers open to a counter charge by the Hussars, and with the casualties sustained thus far the Cuirassiers were unable to stand up to the Austrians. Likewise, the 5th Line also succumbed to the firepower of the Austrian infantry and artillery and fled the field.

The Hussars then took up position in the village, ready to face off against the two remaining French infantry battalions, who advanced onto the hill each forming square alternately. Meanwhile, the Austrian infantry marched against the French artillery, taking casualties along the way.

Turn 14, and in an attempt to force the situation, the Hussars charged the infantry squares. Taking fire as they came in, they luckily managed to break the square but were unable to catch them. Meanwhile, the combined fire of the cannon and Line infantry put paid to one of the French artillery pieces.

Turn 15, and the French artillery had inflicted enough casualties to break the Austrian infantry, who fled towards the bridge. The Hussars charged the infantry square again and this time they were beaten and broken for good, leaving a single cannon defending Fleur. Victory was within my grasp, and the Austrian army was nowhere in sight!
Alas, it was not to be. Turn 15 proved to be the last of the game, and night fell just as the French were within reach of the village and the bridge. It also turned out that the Austrian army never did arrive - my opponent had convinced himself that help was on it's way, and this proved not to be the case.
All in all, things are set up very nicely for a climactic finish! Can Frankreich salvage her honour (and oodles of stolen cash) by defeating the Whitecoats before they can make it back across the border? Can Osterreich stop eating sausages long enough to get away with their ill-gotten loot?
The final, thrilling encounter will determine all!!!
Monday, 4 July 2011
Back from bonnie Scotland!
So after a week-and-a-bit away, I'm back from my jollies after making the trek across the Wall into the uncivilised and barbarian lands beyond!
We (myself and the missus) had a good week - the weather was surprisingly dry for the most part, and we even had a couple of sunny days which was a pleasant (and most unexpected) surprise. Much sightseeing was done, including a few nice castles (to keep the history buff in me happy) as well as some fantastic scenery and wildlife.
Anyway, back to the hobby (which, after all, is what this blog is for!).
The Thursday before we set off on the jollies, I was at the club to play the fourth, and penultimate, game of our Napoleonic campaign. I'll post a detailed report of that in a seperate post, but suffice it to say for now that I was literally inches away from victory when the game ended...
Anyway, while I was at the club I also spent some hard-earned pennies. I probably should have resisted, given that we were setting off on holiday the next day, but I've never been good with temptation! After putting it off for a good six months, I finally succumbed and gave in:

Yes, I finally jumped on the Dystopian Wars bandwagon and purchased a starter fleet. The original plan (back in January) was to go with Prussians, but it seems that quite a few people at the club have started Prussian forces so I went with the second choice of Britannia. I think this has actually worked out in my favour; having waited six months, the Land forces have now been released and I much prefer the Britannia Land forces to the Prussians so I may have actually dodged a bullet!
While I was there, I also picked up a few GF9 Magnetic Bases:


I've heard good things about this kit, and for £6 I figured the time and effort saved was worth it. I've been browsing The UnderEmpire.net to look at the best sizes for Clanrat units so that I can build movement trays to match, and I think so far the best size to build is 5x10 - that way, the tray can be used lengthways to maximise ranks, or it can be turned sideways to form a horde unit. I'll probably think about it a bit more before building any trays, but that sounds like the way to go at the moment.
We (myself and the missus) had a good week - the weather was surprisingly dry for the most part, and we even had a couple of sunny days which was a pleasant (and most unexpected) surprise. Much sightseeing was done, including a few nice castles (to keep the history buff in me happy) as well as some fantastic scenery and wildlife.
Anyway, back to the hobby (which, after all, is what this blog is for!).
The Thursday before we set off on the jollies, I was at the club to play the fourth, and penultimate, game of our Napoleonic campaign. I'll post a detailed report of that in a seperate post, but suffice it to say for now that I was literally inches away from victory when the game ended...
Anyway, while I was at the club I also spent some hard-earned pennies. I probably should have resisted, given that we were setting off on holiday the next day, but I've never been good with temptation! After putting it off for a good six months, I finally succumbed and gave in:

Yes, I finally jumped on the Dystopian Wars bandwagon and purchased a starter fleet. The original plan (back in January) was to go with Prussians, but it seems that quite a few people at the club have started Prussian forces so I went with the second choice of Britannia. I think this has actually worked out in my favour; having waited six months, the Land forces have now been released and I much prefer the Britannia Land forces to the Prussians so I may have actually dodged a bullet!
While I was there, I also picked up a few GF9 Magnetic Bases:

I'm hoping to have my entire Skaven army magnetised, and this is hopefully the first step. The plan is to have these on the underside of the Rat Ogre bases. They're 40mm square, so with a bit of trimming they should fit nicely into the bottom of the GW bases. The Clanrats are going to require a bit more thought as they all have slotta bases, but I'll figure something out eventually. In the meantime, I'm hoping the Rat Ogres will be simple enough to do.
On the subject of Skaven, I'm optimistically assuming that I'll manage to paint more than the current 30 Clanrats, so I've been thinking about movement trays. Usually I just make my own, but I just happened to notice these in a corner of the store:

I've heard good things about this kit, and for £6 I figured the time and effort saved was worth it. I've been browsing The UnderEmpire.net to look at the best sizes for Clanrat units so that I can build movement trays to match, and I think so far the best size to build is 5x10 - that way, the tray can be used lengthways to maximise ranks, or it can be turned sideways to form a horde unit. I'll probably think about it a bit more before building any trays, but that sounds like the way to go at the moment.
Anyway, that's it for now. Keep an eye out for the Napoleonic battle report, I'll try and get it up ASAP!
Thursday, 23 June 2011
Look Snorri, Rats!
Just a quickie to show off the finished Rat Ogres before I go away on my jollies:


What a godsend Devlan Mud is! I wasn't sure how it was going to turn out on larger models like these, but the results are just as pleasing as with the Clanrats. It is sort of cheating, and I'm sure the dedicated painters out there are howling in disgust, but it does save an awful lot of time and effort and still gives a satisfactory gaming standard finish, which is ultimately what I'm after.
Anyway, the blog is going to be quiet for the next week or so as I'll be up in sunny (rainy?) Scotland until next Friday. We'll be playing the fourth game in our Napoleonic campaign tonight, so I'll report back on that next time!


What a godsend Devlan Mud is! I wasn't sure how it was going to turn out on larger models like these, but the results are just as pleasing as with the Clanrats. It is sort of cheating, and I'm sure the dedicated painters out there are howling in disgust, but it does save an awful lot of time and effort and still gives a satisfactory gaming standard finish, which is ultimately what I'm after.
Anyway, the blog is going to be quiet for the next week or so as I'll be up in sunny (rainy?) Scotland until next Friday. We'll be playing the fourth game in our Napoleonic campaign tonight, so I'll report back on that next time!
Monday, 20 June 2011
Rats of War
Shock horror - more progress has been made with the Skaven!
First up, I went back to the Clanrats and painted in the eyes, as well as a few clan markings scattered around on shields. Just a quick snap of the Command group to demonstrate:

One thing I did realise while doing these is that I really need a new Fine Detail brush if I'm going to be painting more Skaven markings - they're all pretty fine lines and my current brush (which has seen a fair amount of service now) isn't really up to scratch...
Anyway, that's the Clanrats wholly finished now and I've started on the Rat Ogres.
 Undercoated in Army Painter's "Leather Brown". The only real downside is that there are only two variants of the IoB models, combined with the fact that they're all two-part models which makes converting them a bit difficult and out of my comfort zone (not to mention the fact that I want to get them painted up reasonably quickly...). Still, a bit of variation on the painting will hopefully differentiate them enough.

Here they are with the basecoats done (unless I've forgotten something...). There are a variety of fur colours in there - Chaos Black, Scorched Brown, Graveyard Earth, Bestial Brown and also the "naked" undercoat of Leather Brown. Some are painted with solid colour (as you can see), while others have been painted in patches to give even more variety.
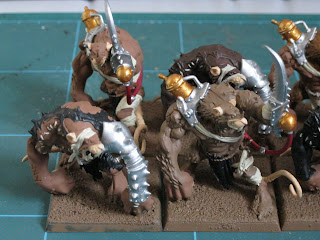


Despite the fact that there are only two poses, they've been surprisingly fun to paint so far. The fur variation should show up even better after the customary Devlan Mud wash, which will also pick out all the details like bandages, stitches, metal work etc.
On a slight sidenote, my appreciation for Devlan Mud has soared while painting the Skaven. I got a pot initially when the GW Washes first came out and used it on Giant Yeti (more on that in a future post perhaps), and I wasn't too impressed to begin with. The more I've used it though, the more I've come to love it. It's great for speed painting, and makes even my shoddy rushed work look half-decent when it's applied!
Anyway, I'm planning on starting the washes tonight (while I watch the concluding episode of Case Histories, plus an episode or two of Game of Thrones) and then it's on to the details! I'm planning on painting the black loincloths with a checkered pattern, just like the Clan Rictus scheme in the "Heraldry and Uniforms of the Skaven" book. Hopefully I'll be able to get the lot completed before I head off to Scotland on Friday.
First up, I went back to the Clanrats and painted in the eyes, as well as a few clan markings scattered around on shields. Just a quick snap of the Command group to demonstrate:

One thing I did realise while doing these is that I really need a new Fine Detail brush if I'm going to be painting more Skaven markings - they're all pretty fine lines and my current brush (which has seen a fair amount of service now) isn't really up to scratch...
Anyway, that's the Clanrats wholly finished now and I've started on the Rat Ogres.


Here they are with the basecoats done (unless I've forgotten something...). There are a variety of fur colours in there - Chaos Black, Scorched Brown, Graveyard Earth, Bestial Brown and also the "naked" undercoat of Leather Brown. Some are painted with solid colour (as you can see), while others have been painted in patches to give even more variety.


Despite the fact that there are only two poses, they've been surprisingly fun to paint so far. The fur variation should show up even better after the customary Devlan Mud wash, which will also pick out all the details like bandages, stitches, metal work etc.
On a slight sidenote, my appreciation for Devlan Mud has soared while painting the Skaven. I got a pot initially when the GW Washes first came out and used it on Giant Yeti (more on that in a future post perhaps), and I wasn't too impressed to begin with. The more I've used it though, the more I've come to love it. It's great for speed painting, and makes even my shoddy rushed work look half-decent when it's applied!
Anyway, I'm planning on starting the washes tonight (while I watch the concluding episode of Case Histories, plus an episode or two of Game of Thrones) and then it's on to the details! I'm planning on painting the black loincloths with a checkered pattern, just like the Clan Rictus scheme in the "Heraldry and Uniforms of the Skaven" book. Hopefully I'll be able to get the lot completed before I head off to Scotland on Friday.
Tuesday, 14 June 2011
Asrai.org Miniature Exchange
About a year ago, I got involved in a Miniature Exchange run on Da Warpath. For those not familiar with the concept, you promise to paint one figure or vignette in the two month time limit, and send it to whomever you are assigned. In return, you will receive a model sent by another painter.
Well, for Da Warpath's Exchange I painted up an old 5th Edition Orc Standard Bearer for jimbob1066e


It's a great classic figure (in my opinion) and I liked it so much, I bought two so that I could paint the other one up and keep it for myself.
I haven't got round to painting the second Orc yet, but I have finally gotten round to organising a similar project on Asrai.org! We've had 23 participants sign up and everyone has been assigned a painter. This also means that I'll be painting a figure up for someone as well. I spent most of Sunday evening browsing the 'net for ideas, and placed a bitz order yesterday to get all the parts I need. I've just been contacted by BitzBox.com to say that my order is now on it's way and so I'll likely be able to start building just in time for my holiday to Scotland! I might just hide my modelling stuff in the suitcase (away from the prying eyes of the other half!) and take it all with me to work on should we encounter any rainy days...
Now, the rules of the project mean I can't post WiP photos until the model has been sent and received, but I'll be sure to take plenty while I work to post when it's OK to do so. Until then, you'll just have to make do with written updates on my progress!
Well, for Da Warpath's Exchange I painted up an old 5th Edition Orc Standard Bearer for jimbob1066e


It's a great classic figure (in my opinion) and I liked it so much, I bought two so that I could paint the other one up and keep it for myself.
I haven't got round to painting the second Orc yet, but I have finally gotten round to organising a similar project on Asrai.org! We've had 23 participants sign up and everyone has been assigned a painter. This also means that I'll be painting a figure up for someone as well. I spent most of Sunday evening browsing the 'net for ideas, and placed a bitz order yesterday to get all the parts I need. I've just been contacted by BitzBox.com to say that my order is now on it's way and so I'll likely be able to start building just in time for my holiday to Scotland! I might just hide my modelling stuff in the suitcase (away from the prying eyes of the other half!) and take it all with me to work on should we encounter any rainy days...
Now, the rules of the project mean I can't post WiP photos until the model has been sent and received, but I'll be sure to take plenty while I work to post when it's OK to do so. Until then, you'll just have to make do with written updates on my progress!
Rats!
You'll never guess what's happened...
I've finally finished the Clanrats!


After all that procrastinating, they only took me an afternoon/evening of not-that-determined effort to finish them off. Although it's taken me the best part of three months from start to finish, the actual painting time has been considerably less than that - I reckon I could get the next unit done with just a couple of days of determined painting. Given that it's difficult for me to get two days where I can focus on nothing but painting though, I think aiming to complete them within a week or two would be more realistic.
Looking at the photos, I might actually go back and paint in the eyes on these after all. I wasn't going to bother to begin with, figuring that they'd be lost within the mass of fur, but they actually show up quite prominently so it might improve the look of the unit to pick out those little specks of red after all.
Anyway, that's 30 Clanrats more or less out of the way! Only another 170 to go....
I've finally finished the Clanrats!


After all that procrastinating, they only took me an afternoon/evening of not-that-determined effort to finish them off. Although it's taken me the best part of three months from start to finish, the actual painting time has been considerably less than that - I reckon I could get the next unit done with just a couple of days of determined painting. Given that it's difficult for me to get two days where I can focus on nothing but painting though, I think aiming to complete them within a week or two would be more realistic.
Looking at the photos, I might actually go back and paint in the eyes on these after all. I wasn't going to bother to begin with, figuring that they'd be lost within the mass of fur, but they actually show up quite prominently so it might improve the look of the unit to pick out those little specks of red after all.
Anyway, that's 30 Clanrats more or less out of the way! Only another 170 to go....
Subscribe to:
Posts (Atom)